Irish Coffee Cake


Irish Coffee Cake 1

As I sat drinking a break time coffee wishing it was an Irish version, I realised that within my daylight hours I resided in a regimented World punctuated by bells, demands and deadlines. On top of that I’ve two self-inflicted days of fasting followed by five days of visiting the ‘Land of eat whatever I fancy’. Life felt too controlled, I longed to be free even if just for 10 minutes so I hatched a cunning lunch time plan that involved:

  1. Desertion
  2. Crime
  3. Smuggling contraband

Irish Coffee Cake 4

That does sound grand, but you’ll be glad to know that the contraband was in the form of Irish coffee cake which is the most acceptable way to bring alcohol into the workplace (ooh I’m so naughty).

I tortured myself by making this cake on a fasting day; there was no licking of fingers, bowls or sneaky tasting therefore its success remained a mystery until the next day (I know I’m so hard-core in the self-torture department). When I took these pictures I had to wrap the cake slice up and yes that was very hard, I may have licked my computer screen just a little bit but don’t tell anyone.

Irish Coffee Cake 5

As the following lunch time at work arrived I threw off my goody two shoes veil to become a wicked woman about to take a walk on the dark side. I deserted my post, stole out of the confines and told myself I could just keep on walking if I didn’t feel any better after five minutes. Trees whispered, birds darted past and teenager’s feet stampeded for cover as I inadvertently walked past their secret cigarette lair all of which made me smile.

Irish Coffee Cake 2

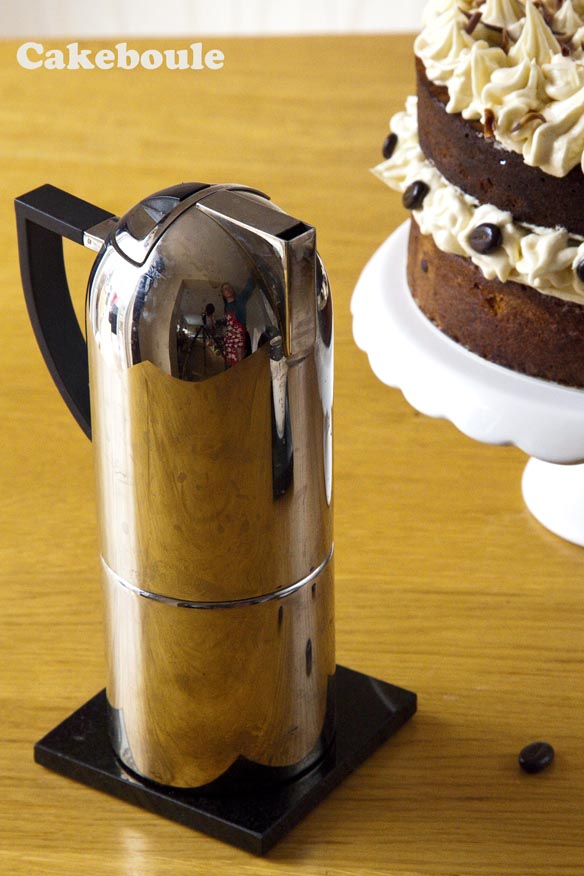
I felt so much better that I turned back towards the hallowed halls. Feeling stronger I dared myself to commit a detention nominated crime by entering a clearly marked exit door and skipped up the one way only stairs. There was one mission left to complete as I crept back into my office trying to hide the flush of fresh air which had reddened my face. I pulled out the contraband, my hands shook slightly as I opened the foil hiding a cake cocktail* of rich coffee with Baileys white chocolate buttercream. The time was now, fast day was over and there was only two more minutes of peace before the bells tolled so I took a big bite and realised there is truth within the words ‘naughty but nice’. The cake tasted exactly as I imagined it, I felt like I’d been transported to a glitzy restaurant where I indulged in an Irish coffee over lazy chatter.

It’s the little things in life that matter, you’ll never say on your death-bed ‘I’m so glad I spent all those hours at work’ instead why not take just 10 minutes for yourself and be a little bit naughty next lunch time. Your work will be better due to lower stress levels which results in an increase in effectiveness and cake always boosts happiness so what’s to lose?

*always eat cake responsibly

Traditionally, Irish coffee consists of hot coffee, Irish whiskey, and sugar stirred and topped with thick cream I have altered this idea to fit my cake vision (fresh cream wasn’t that practical for transporting) but feel free to adapt it anyway you wish.

Irish Coffee Cake 3

Irish Coffee Cake

Coffee Cake Ingredients

400g Salted Butter (room temperature)
400g Caster sugar
400g Self raising flour
8 eggs
5 tbsp espresso ground coffee (instant) mixed with 3 tbsp of boiling water

Instructions for Coffee Cake

1. Pre heat the oven to 160 / 140 fan or Gas 3
2. Line two deep 20cm tins (do use the right size tins to avoid disaster)
3. Beat the butter and sugar until fluffy (5 minutes as this is what makes the cake rise so beautifully to get the full big cake wow factor so not skimp this part. I also find that using very soft butter (but not liquid) helps the creaming process)
4. Add the eggs two at a time and sift quarter of the flour into the mixture and beat until combined
5. Repeat until all eggs and flour are used up
6. Add coffee extract and mix
7. Place the tins in the oven on the middle shelf for approx 50 minutes (all ovens vary so check your cake after 45 mins)
8. Cakes are ready when the skewer can be inserted into the cake and it come out clean.
9. Leave in the tin for 5-10 minutes before removing and placing on a wire rack to cool

White Chocolate and Baileys Buttercream Recipe

250g Salted Butter (room temperature)
500g Icing sugar
250g White chocolate melted
125ml Baileys (or cheaper alternative!)

White Chocolate and Baileys Buttercream Instructions

1. Beat together the butter and icing sugar until light and fluffy
2. Melt the chocolate ( I do mine in 10 second stints in the microwave)
3. Let the melted chocolate cool slightly (10 mins)
4. Pour the chocolate into the buttercream mixture in small quantities beating as you do until all the chocolate has been incorporated.
5. Add the baileys and beat to combine one last time

Assembly of the Cake

1. Level the cake that will be the bottom layer
2. Smother the bottom layer of cake in buttercream and add the top layer of cake
3. Smother the top of the cake in buttercream, make spiking patterns with a palette knife
4. Cover with grated chocolate

      5. Eat and enjoy your naughty contraband

Chocolate Orange Marble Cake


Sometimes you want cake and you want it right now! Yes a great big wedge of cake on your plate with a fork in your hand ready to devour it.  I adore all the beautiful mini treats and cakes like Sarah from Maison Cupcakes makes there are those times where large is the only thing that will feed your craving. This cake was for one of those times.

Chocolate Orange Marble Cake

Beautiful swirls of chocolate and orange cake smothered in a chocolate orange buttercream and topped with grated chocolate orange and the best bit is it is messy so perfect for finger licking.

Chocolate Orange Cake

This is pay-day cake 6 on the list do stop by my recipe page to see the others – as always think large as there are no small pay-day cakes in my collection.

Chocolate Orange Marble Cake

To all my followers I wanted to let you know the Cakeboule is going offline for the Summer to recharge the baking batteries. So I’ll leave you with this massive slice of cake and as Arnie says ‘I’ll be back’.

Chocolate Orange Marble Cake

Have a great Summer everyone and I hope the sun shines wherever you are. Go and make happy memories as that is what I intend to do. Ta Ta For Now.

Chocolate Orange Marble Cake

Chocolate Orange Marble Cake Ingredients

400g soft butter
400g caster sugar
400g self raising flour
8 eggs (must be fresh)
50g cocoa powder
1 tbsp milk
1.5 tsp orange extract
2 oranges (grated rind only)

Chocolate Orange Marble Cake Instructions

1. Preheat the oven to 160 / 140 fan or Gas 3
2. Line two deep 20cm tins (do use the right size tins to avoid disaster)
3. Beat the butter and sugar until fluffy (5 minutes as this is what makes the cake rise so beautifully to get the full big cake wow factor so not skimp this part. I also find that using very soft butter (but not liquid) helps the creaming process)
4. Add the eggs two at a time and sift quarter of the flour into the mixture and beat until combined
5. Repeat until all eggs and flour are used up
6. Split the mixture into two bowls equally (I weigh mine to be sure)
7. Add 50g of cocoa and 1 tbsp of milk to one portion and mix to combine
8. Add orange extract and rind to the other portion and mix to combine – I also added a small bit of orange colouring to make the orange colour stand out more but this optional)
9. Take two big spoons and alternate dollops of chocolate and orange mixture into both tins trying to make sure you have equals amounts (you can weigh your portions to be sure if you wish)
10. Use a knife or skewer and run it through the mixture to create swirly patterns  do not over do this or you will not end up with the big swirls but a combined mess!
11. Place the tins in the oven on the middle shelf for approx 50 minutes (all ovens vary so check your cake after 45 mins)
12. Cakes are ready when the skewer can be inserted into the cake and it come out clean.

Chocolate Orange Buttercream

250g soft butter
500g icing sugar
100g melted plain chocolate
1.5 tsp orange extract

Instructions

1. Beat together the butter and icing sugar until light and fluffy
2. Melt the chocolate
3. Let the melted chocolate cool slightly (10 mins)
4. Pour the chocolate into the buttercream mixture in small quantities beating as you do until all the chocolate has been incorporated.
5. Add the orange extract and beat to combine one last time

Assembly of the Cake

1. Level the cake that will be the bottom layer
2. Smother in buttercream and add the top layer
3. Smother the top in buttercream and make spiking patterns with a pallete knife
4. Cover with grated chocolate orange

Devour! See you soon 🙂

Gooey Popcorn Bars (Gluten Free)


Say sod it and call a movie night with a gooey, toffee, marshmallow and chocolate covered popcorn bar in hand.  Seek pleasure watching the silky caramel strands form as you pull the bars apart. This is a quick tray bake but with no baking (bonus!) but guaranteed to brighten up the dull and miserable summer we are having and great for big kids parties.

Popcorn Bars

I have never made popcorn before and I was more than a little bit excited when I saw fluffy white clouds pinging around my saucepan. Truthfully I was that excited I had to call the entire family to watch a miracle in the pan. If you have never made popcorn before then you truly have not lived.

Popcorn Bars

This recipe is an adaptation of my toffee crispie treats. After spending days discussing films set in New York with a friend I am now eager to sit down with one of these next week watching chick flicks to my hearts content so go on let it rain see if I care.

Popcorn bars

Of course you can top them with anything you like as this is an easily adapted recipe. I like the idea of twix or malteaser topppings or give it blast with some popping candy a la Heston style.

Popcorn BarsThe cat loved them too as he sauntered into the photograph, sniffed and then bit my finger!

Popcorn Bars

Enjoy!

Ingredients

250g toffees (Sainsbury’s Basics)
50g butter (room temperature)
3 tbsp of milk
1 tbsp of golden syrup
115g marshmallows
80g popped popcorn

Instructions

1. Brush your a 20cm square tin (or other suitable) with baking spray or oil and wipe with a kitchen towel to make sure it is not too oily.
2. Add toffee, golden syrup, butter and milk into a saucepan and heat gently.  Stir the mixture as it heats until all the ingredients have melted.
3. Add marshmallows and stir until they have melted.
4. Add the popcorn to the pan and make sure it is well coated with the toffee mixture
5. Pour quickly into prepared tin and flatten it down well with the back of a wet wooden spoon.  Add whatever toppings you fancy by pushing them down gently into the mixture so they set into to it.
6. Leave to set (about an hour) and cut into sizes required and eat (one is not enough) they will keep for about 5 days if they get that long in an air tight container. Do not place in the fridge or the pocorn will go soft.

Up next – Pay Day Cake 6 time!!!! (see previous here)

I am entering this into the Teatime treat competition hosted by the talented Karen from Lavender and Lovage and the theme this month is cake stall cakes and I think this will fit quite nicely.

Triple Chocolate Mousse Cake with Chocolate Covered Strawberries


Triple Chocolate Mousse Cake

Introducing Pay Day Cake 5 the triple chocolate mousse cake lovingly covered with chocolate covered strawberries.  This is probably not an eat in ‘best company’ cake as I find its destruction is accompanied by a loud drawn out satisfied sigh which you won’t realise you’ve made until you feel the heat of others eyes boring into you from all directions (they’re just jealous). Chocloate covered strawberriesIf you are kind enough to make this triple chocolate mousse cake for a special occasion you will find there are few people who can resist the sweet aroma of this celebration cake. Triple Chocolate Mousse Cake

A garden decorated with sparkly disco balls, candles and freshly made  pink lemonade jar cocktails greeted my Best Friend for her Birthday.  I am now known as the ‘Jar Lady’ which is a step up from the cat lady but only slightly. We had a great evening full of laughs, food and an impromptu random birthday dance that even the village people would have been proud of.

Triple CHoclate Mousse

As it turned dark I choose a song on my MP3 player but it randomly played its own choice of ‘It’s a beautiful day’ by U2 which I didn’t even know I had but it summed up the evening.  This was topped off with fairly lights that are not designed to twinkle but decided they would for ‘one night only’ in time with the beat for the entire song now how bizarre is that! I have no idea why these odd things keep happening but whoever is watching over me (maybe it’s the man in the photo that was taken of me on my recent holiday post) they obviously saw me having the time of my life and decided to add a bit of magic to an evening with friends that I will truly never forget.

You see the more you watch and pay attention to the World the more messages it gives you. Like it’s OK to have forgotten the candles when you find sparklers in the drawer you forgot you had but they were so much better.

Triple Chocolate Mousse

The laws of synchronicity are at work right now as somehow it decided you would stumble upon my little post which means you were destined to be here.  No matter how many years later you find this post share a little bit of mousse magic by passing it on to everyone you know and keep the Universe happy.

P.s the moment I pressed save my computer shut it self down of its own accord – this was to tell me to shut up I think – look Frugal Feeding I made it under 500 words whoo hoo albeit without the recipe 🙂

Day 1 – Bake the Cake layer (as in previous mousse cake post this is the second half of the layer)

Ingredients for Base Genesoise Cake Layer
75g plain flour
50g cocoa (good quality) or replace 50g flour for a plain base.
4 eggs at room temperature
125g caster sugar
30g melted butter (left to cool)

Instructions
1. Grease and lightly flour a 20cm round tin
2. Melt the butter in a pan and leave to cool
3. Beat the eggs and suga at a medium speed for 12 minutes until when you lift the whisk attachment out of the mixture falls in ribbons and pools on top of the mixture without disappearing straight away.
4. Sieve the flour and cocoa over the mixture
5. Fold in gently until combined
6. Drizzle in the butter and fold in – do not over fold or the cake will become tough – so when you think it is is nearly there and there are no huge lumps be brave and put it in the oven.
7. Bake in the oven on the middle shelf for 30 minutes
8. Leave to cool for 10 minutes before removing from tin and placing on a wire rack
9. Add 2 tablespoons of raspberry liqueur (Chrombards, Framboise) to 2 tablespoons of caster sugar – heat gently until the sugar is dissolved. Brush liberally over the cake to moisten it. If you prefer you can use a simple sugar syrup which is equal parts sugar to water and you can add a flavouring or substitute with another spirit.
10. Divide the cake into two layers using a long serrated knife.
11. Wrap the cakes in greaseproof paper once cool and wrap in foil. Either store in an airtight container until you need it or put it in the freezer.

Day 2 – Chocolate Mousse (based on Michael Roux – Desserts)

Ingredients
150g chocolate finely chopped
2 sheets leaf gelatin
50ml milk
1 1/2 tsp of liquid glucose
2 egg yolks
150ml whipping cream
30g icing sugar

Instructions

1. Set a bowl over a saucepan which is filled to one-third with water. To the bowl add the chopped white chocolate. Using a low heat wait until the chocolate is half melted and remove from the heat. The chocolate will melt by itself and this reduces the risk of it burning.
2. Soak the gelatin in cold water for 5 minutes. (optional)
3. Heat the milk in small saucepan until boiling point and then remove from the heat.
Squeeze out the water from the gelatin and add it to the milk. Stir gently until the gelatin has dissolved (optional)
4. In another bowl add the egg yolks, liquid glucose and 3 tbsp of warm water. Mix together until combined.
5. Whip the cream and icing sugar in another bowl until the cream leaves ribbon trails when you take the whisk out of the mixture.
6. Pour the hot milk over the white chocolate and gently mix with a whisk until there are no lumps and is it a smooth consistency.
7. Add the egg mixture to the chocolate and mix gently until combined.
8. Using a spatula fold in the cream gently until fully combined.

Assembly (phase 1)

1. Get your original tin that you baked your cake in – place the cake in the bottom (tip: use the bottom layer of the cake as the top layer will be smaller as cakes shrink as they cook). You can use the bottom layer for another cake.
2. Pour the mousse into the tin.
3. Place the tin in the freezer overnight for best results.

Day 3 – White Chocolate Mousse (based on Michael Roux – Desserts)

As above but replace the dark chocolate with white.
Take the cake from the freezer and pour white mousse mixture onto the cake and return to the freezer overnight or leave in the fridge overnight to set if serving the next day. The cake will last for at least one month in the freezer.

Day 4 – Strawberries & Eating!

1. Make Chocolate covered strawberries by melting 100g of chocolate in a bowl and dip the strawberries liberally into it.  Let the chocolate drip off the excess before placing on a sheet of greaseproof paper to set.  Melt some white chocolate (approx 50g) and drizzle over the top on the strawberries once set.  Either do this with the back of a spoon or  used a mini squeeze bottle.

2. To remove the mousse cake from the tin use a hair dryer or blowtorch to gently heat the tin so that it removes easily. Add the strawberries on top when you are ready to serve or the juices will escape and bleed into the cake.  Slice into portions with a warm knife (cleaning after each slice).

Enjoy!

7 tips for Gluten Free Baking (GF)


So you have been nominated to make a cake for a gathering and then someone says to you ‘hey can you make it gluten free?’.  You get sweaty just thinking about it, I mean gluten free – what is that?  You wonder how you are going to create a cake without flour but somehow find yourself nodding at the same time – well it is rude to say no.  If gluten free baking is something you have not done before you know that hours of internet research is ahead of you .  Where do you even start? Well you read on and find out…

Understand what Coeliac is (taken from coeliac website)

“Coeliac disease (pronounced see-liac, spelt celiac disease in other countries) is an autoimmune disease. Gluten, which is found in wheat, barley and rye triggers an immune reaction in people with coeliac disease. This means that eating gluten damages the lining of the small intestine. Other parts of the body may be affected.”

It is very limiting to be on a gluten free diet especially when out socialising as you have no control over what has gone into the food and eveything can potenitally be the gluten devil.  Wheat free is generally a food intolerance but coeliac (gluten free) is an autoimmune disease.  Do not think that a person who is Coeliac (GF) will eat be OK eating a bit of gluten every now that they might be a bit ill but they’ll be alright.  Gluten can have a very damaging effect on their intenstines in the long term and cause complications such as infertility, osteoporosis and bowel cancer.  Once diagnosed like an alcoholic they have to avoid gluten for life as this is the only way to control it and even one bit of gluten can upset the stomach and intenstines for day and out them back to square one.

My Top Gluten Free Bakes

I was recently invited to attend an overdue gathering of friends when I got that request for gluten free cake so I set to work to meet the challenge so nobody felt they were missing out.

1. Firstly I started with toffee crisp bars.  These always work well , requitre little effort and everyone lovesthem.  Do check the ingredients of the toffee and marshmallows (made from corn) you buy. If you wnat to cover them in chocolate you will need a gluten free chocolate. Most chocolate is GF (good ones) but some do use it- Nestle chocolate is GF where as Cadburys has been reclassified as having a very low gluten content. I made the toffee crips as a tray bake in a 20cm tin rather than moulds like below for speed. Final tip on that – use a wet wooden spoon to press it down into the tin!

2. A rather dodgy looking but yummy chocolate cherry cola cupcakes was made by my Son and Husband. Note: Cola and GF flour do not like each other!

3. I made fruit alternative as the choclate base was already covered with a zesty lemon polenta cake with fresh berries to satisfy all tastebuds. Polenta is a GF grain and this is more of a dessert cake with a satisfying texture that I really enjoyed.

4. My naughty hot chocolate fudge sauce is also gluten free and we poured it over vanilla ice cream again watch out fo rice -cream but there are some very gluten free varities and I swear by Swedish Glace which I know Saisnbury does stock as it is delicious. When using cocoa in a recipe as always with gluten free baking be vigilant check as it can contain cereals and starch which are a no no.  I use Green and Blacks 70% Cocoa which is GF. Nestle also offer GF cocoa and hot chocolate powders that you can use and are easy to get.

I can tell you now it is worth the effort as anyone on a strict GF diet will love you forever if you make them cake as some varieties in supermarkets are not always that nice and can be very expensive.  To help you understand more here are some general guides as to what coeliacs can and can’t eat. There are many other recipes out there that involve alternative flours but if you are not following a GF diet here are my top tips to adapt a favourite recipe you already have:

1. Use 1 tsp of xantham gum in cakes stops them from being too crumbly in texture which is notorious in gluten free cakes especially ones that don’t have lot’s of moisture in them e.g victoria sponge.

2. Gluten free cakes can be quite dry so don’t be afraid to add extra moisture. Into a 20cm cake I will normally add an extra 1 – 2 tbs of milk, water or fruit juice (depending on the flavour of cake).

3. Subsitute any ordinary wheat / gluten based flour with a gluten free flour alternative these are available in plain and self-raising. In my own experience Doves farm is my favourite but there are others. You can easily adapt the same recipe you love this way.

4. For fail safe baking and first attempts – go for moister cakes like carrot, coffee or fruit as in my expereience they tend to work better and will not have that gluten free taste twang that you can sometimes get with a vanilla sponge.

5. Check your baking powder is gluten free – I only use this type anyway so that I do not get the wrong one by accident.

6. Icing sugar (by Silver Spoon) is gluten free so you can still use this to make buttercream icing.

7. Watch out for starch (check what sort it is – potato is OK but see tip 7). Corn is OK, wheat must be avoided and oats are ad odd one.  Manufacturers seem to process oat goods in the same spaces as wheat ones therefore cross-contaminating them so my advice is if it it does not clearly state gluten free then don’t use it. If in doubt check the manufacturers website but for the best list of ingredients to avoid click here – once you see the list you will soon start to realise just how limiting a GF diet is and how they sneak naughty gluten into most our food.

Make someone’s day who is GF and bake them a cake.

Hope that helps so you never have to sweat again 🙂

Hot Chocolate Fudge Sauce (Gluten Free)


So Easter is over and no longer will we have to endure cute bunnies and eggs taking over the blog World.   If you want to use up your left over Easter eggs then try this  recipe for naughty hot chocolate fudge sauce which is perfect accompaniment to an ice-cream sundae and you can use up any left over easter eggs either in the sauce of by scattering them on top.

This sauce so my family tells me is rich, fudgy and as my son says ‘delish’.  It only took 20 minutes to make and would make a great gift coupled with a small bag of chocolate or fudge to give the gift of a Sundae.  A number of friends have told me I should go on Dragon’s Den with this recipe or sell it to Ann Summers for lickable body paint but I think not.  Of course what you do with the sauce in your own home is up to you.

You are probably wondering why I have not tried any of this sundae if it is so delicious?  Well,  milk and I do not see eye to eye.  In a chemical warfare battle between my stomach and ice-cream – the frozen stuff wins and it is just not worth it.  It was so hard to take these photographs and not lick the spoon or the bowl as I love ice-cream but it would have reaped its revenge on me.  Luckily I enjoyed watching my boys and the surrogate one (Ron) lick their spoons with glee so that made up for it.

The sauce will keep in the fridge for a few weeks (or more) if you use a sealed jar (e.g Kilner or Mason). To use the sauce just scoop the sauce you need into a bowl and heat in a pan or in the microwave for about 30 seconds on medium until it comes back to pouring consistency. I have included the jar label files (scroll down) so you can decorate your jars and make them look all pretty. Just print them out and glue them on I only used a glue stick as they are not going to stay on very long. I have included photoshop editing compatibility on the pdf for those who wish to edit and change the wording or colours – my gift to you.

You could also use the sauce on a cake between the layers for a chocolate fudge experience and heat it up and serve it with ice cream mmmmm.

The Geeky Hunt

I set my family an Easter Egg hunt where for each egg found they were given a binary number as I still on a binary kick (read chocolate & binary – trust me it is the best learning combination).  I can’t say they were initially thrilled at the idea as it required effort but no pain no gain I say and after all Mummy had been to Hotel Chocolat and therefore extra effort to gain these gifts were required.  Once they had worked out the decimal from the binary code (one per egg found)  they had to match the number to the letter in the alphabet (e.g 1 = A, 2 = B) then they had to put the letters in the right order to find out the location of their egg.  Ha ha I loved watching them try to figure it out 🙂 and I am so doing it again next year.

Ingredients (Hot Chocolate Fudge Sauce adapted from BBC Good Food)

To make this gluten or wheat free – use Green and Blacks Cocoa or Nestle – or check the manufacturers label. For more tips see my post – 7 tips for gluten free baking.
200g granulated sugar
140g vanilla sugar or use caster sugar and 1 tsp vanilla extract or 1 vanilla pod (seeds)
85g dark muscavado sugar
1/2 tsp espresso powder
100g cocoa (I use green and blacks)
30g cornflour
1 tin (410g) of evaporated milk
250ml water
50g butter cut into small cubes
2 tsp of vanilla extract (add at the end of cooking)

Instructions
1. Place all the ingredients into a large pan over a medium heat and stir constantly until you reach boiling point (approx 10 – 15 mins).
2. Continue cooking for a further 5 mins and the sauce will begin to thicken. Depending on how you like your sauce (thick or slightly runny) take it off the heat when you are happy with the pouring consistency. Add the vanilla essence.
3. If you are not using the sauce straight away you can pour into sterilised jars and add pretty labels.

The PDF labels (I have not done this before so please do not yell at me if this does not work!) I believe all you need to do is click on the link to open the file and then right click to save it (you will need a pdf reader).

PrintablesSml

Coffee, Vanilla Latte and Caramel Layer Cake – The Machiatto


This is my pay day cake – the cake that rewards me for making it to the end of the month and indulges me with my own piece of cake land heaven (sigh).

Coffee Vanilla Caramel Macchiato Cake

In honour of feeling knackered this month I wanted to create a ‘Macchiato’ which is a coffee drink found in Starbucks consisting of espresso, milk. froth and drizzled with caramel. So I set out to recreate this in cake form that will last longer then a coffee (well maybe?) but will still give a coffee buzz and a sugar rush. It had to be big and as I enjoyed making my Tiffany inspired chamapgne layer cake earlier in the year I knew I wanted to make another one.

Coffee Vanilla Caramel Macchiato Cake

Inside this layer cake there are four layers of espresso flavoured coffee cake one layer earnt for each week worked.  I think a pay day cake should be desirable and luxurious with no saving pennies or calorie counting allowed as it is a once a month treat.

Coffee Vanilla Caramel Macchiato CakeEach coffee liquor soaked layer has lashings of rich dulce du leche caramel and vanilla bean latte buttercream.  The entire cake is bathed with swirling layers of buttercream and edged delicatley with dulce du leche caramel.

Of course the best thing about going out to Starbucks is usually a toss up between the silky caramel drizzle or the little caramel wafers on top of your cup that go all gooey with the heat.

To make the experience as close as possible my ‘Macchiato’ layer cake has these butter toffee wafers too, after all this is pay day cake and I want to have it all for a moment before going back to basics next week.

Coffee Vanilla Caramel Macchiato Cake

I like this idea so much I think I will make myself a pay day cake each month.  Want a bite? Go on…

Macchiato Coffee Vanilla Caramel Cake

Ingredients for Coffee Cake

400g Butter (room temperature)
400g Caster sugar
400g Self raising flour / cake flour
8 Eggs (room temperature)
2 tsp Homemade vanilla extract (or use good quality)
4 tsp of Espresso instant powder (or to your own taste)
Water to make up 50ml of coffee
1 tin of dulce du leach / caramel (this will be used for the filling later – I use Nestle)

Preheat the oven to 150 / 315F / Gas 2-3 or 140 fan

  1. Grease and line two 8inch / 20cm deep cake tins (I use silverwood)
  2. Combine the butter and sugar in a bowl and beat until fluffy and pale in colour (about 5 mins)
  3. Add two eggs and mix until combined
  4. Add half the flour and mix until combined
  5. Repeat with the remaining eggs and flour
  6. Make up the espresso with 4tsp of coffee added with enough water to make 50 ml
  7. Add vanilla extract and mix for the least time until the flavours are mixed in
  8. Pour the batter evenly into two tins (you can weigh the mixture)
  9. Place in the middle of the oven and bake for approx 50 mins or until cake is springy to the touch and a cake tester / skewer comes out clean.
  10. Leave in the tin to cool

Layering the Cakes

  1. Once cool – cut the top edge off each cake to make it level
  2. Measure the height of your cakes to work out equal layers
  3. Slice each cake in half horizontally to make four layers  ( I use a serrated knife to do this – I go around the sides of the cake first before then taking the knife across the remaining middle section to get a clean layer – see the video on the tiffany inspired champagne layer cake for this)

Ingredients for Coffee Sugar Syrup
45ml coffee liquor (or use espresso mix again)
3 tbsp of homemade vanilla sugar (or you can use any type of brown sugar)

Heat the coffee liquor and sugar in a small pan until the sugar has dissolved
Brush the mixture evenly onto each cake layer

Vanilla Bean Latte Buttercream
400g softened butter
800g icing sugar
6 tbs milk
4tsp instant espresso powder
2 vanilla beans (seeds scraped out)
2 tsp homemade vanilla essence (or other good quality)

  1. Cream the butter and  milk until light and fluffy
  2. Add the icing sugar and continue beating until it is well combined and light and fluffy in texture
  3. Add the espresso powder to the 2 tsp of vanilla extract and pour into the buttercream mixture
  4. Add the beans / seeds from 2 vanilla pods and add to the buttercream mixture
  5. Mix for the final time until all flavouring is well combined
  6. Use straight away or if putting it in the fridge remember to allow at least an hour for it to come fully back to room temperature so it is soft enough to pipe

To Assemble the Cake

Add a dollop of buttercream to the centre of your cake stand and then add your first layer of cake and press down – this will keep your cake in place.

Layer your cake in this order

1st layer – caramel
2nd layer – buttercream
3rd layer – caramel

  1. Use a palette knife to spread out the fillings and make sure you don’t go right to the edge or the caramel is likely to ooze down the sides of your cake.
  2. Add a very thin coating layer of buttercream using a palette knife all over your cake (don’t worry what it looks like) and place in the fridge for 30 mins so the buttercream can firm up.  This will stop crumbs getting into your icing.
  3. After 30 mins use a large palette knife to ice your cake all the way round (again the video on the tiffany layer cake is very good at showing you this).  Iit is much easier if you have a cake turntable – I do not have one but I do have a lazy susan (revolving circle wooden board) so I used that and it worked perfectly!
  4. To get the same effect with the buttercream as I did you need a small palette knife placed flat on the side of the cake at the bottom.  Hold the palette knife and move the cake round on the turntable until you reach the top.  It is like running your finger round and round your cake.
  5. I then used a palette knife loaded with dulce du leche and went round the same pattern gently to add a touch of caramel to the layers.
  6. Make a criss cross on the top of the cake with caramel (just like they do in Starbuck) and pipe buttercream on the top in what ever formation you like – top with a butter toffee wafer and get ready to eat.

This cake will last well in an airtight container for a few days.  I also entered into the fantastic Alphabake Challenge for March and this month’s letter is M.  The challenge in kindly hosted by The More than Occasional Baker and this months host Caroline Makes.

Enjoy! x