Rolo Cupcake Challenge


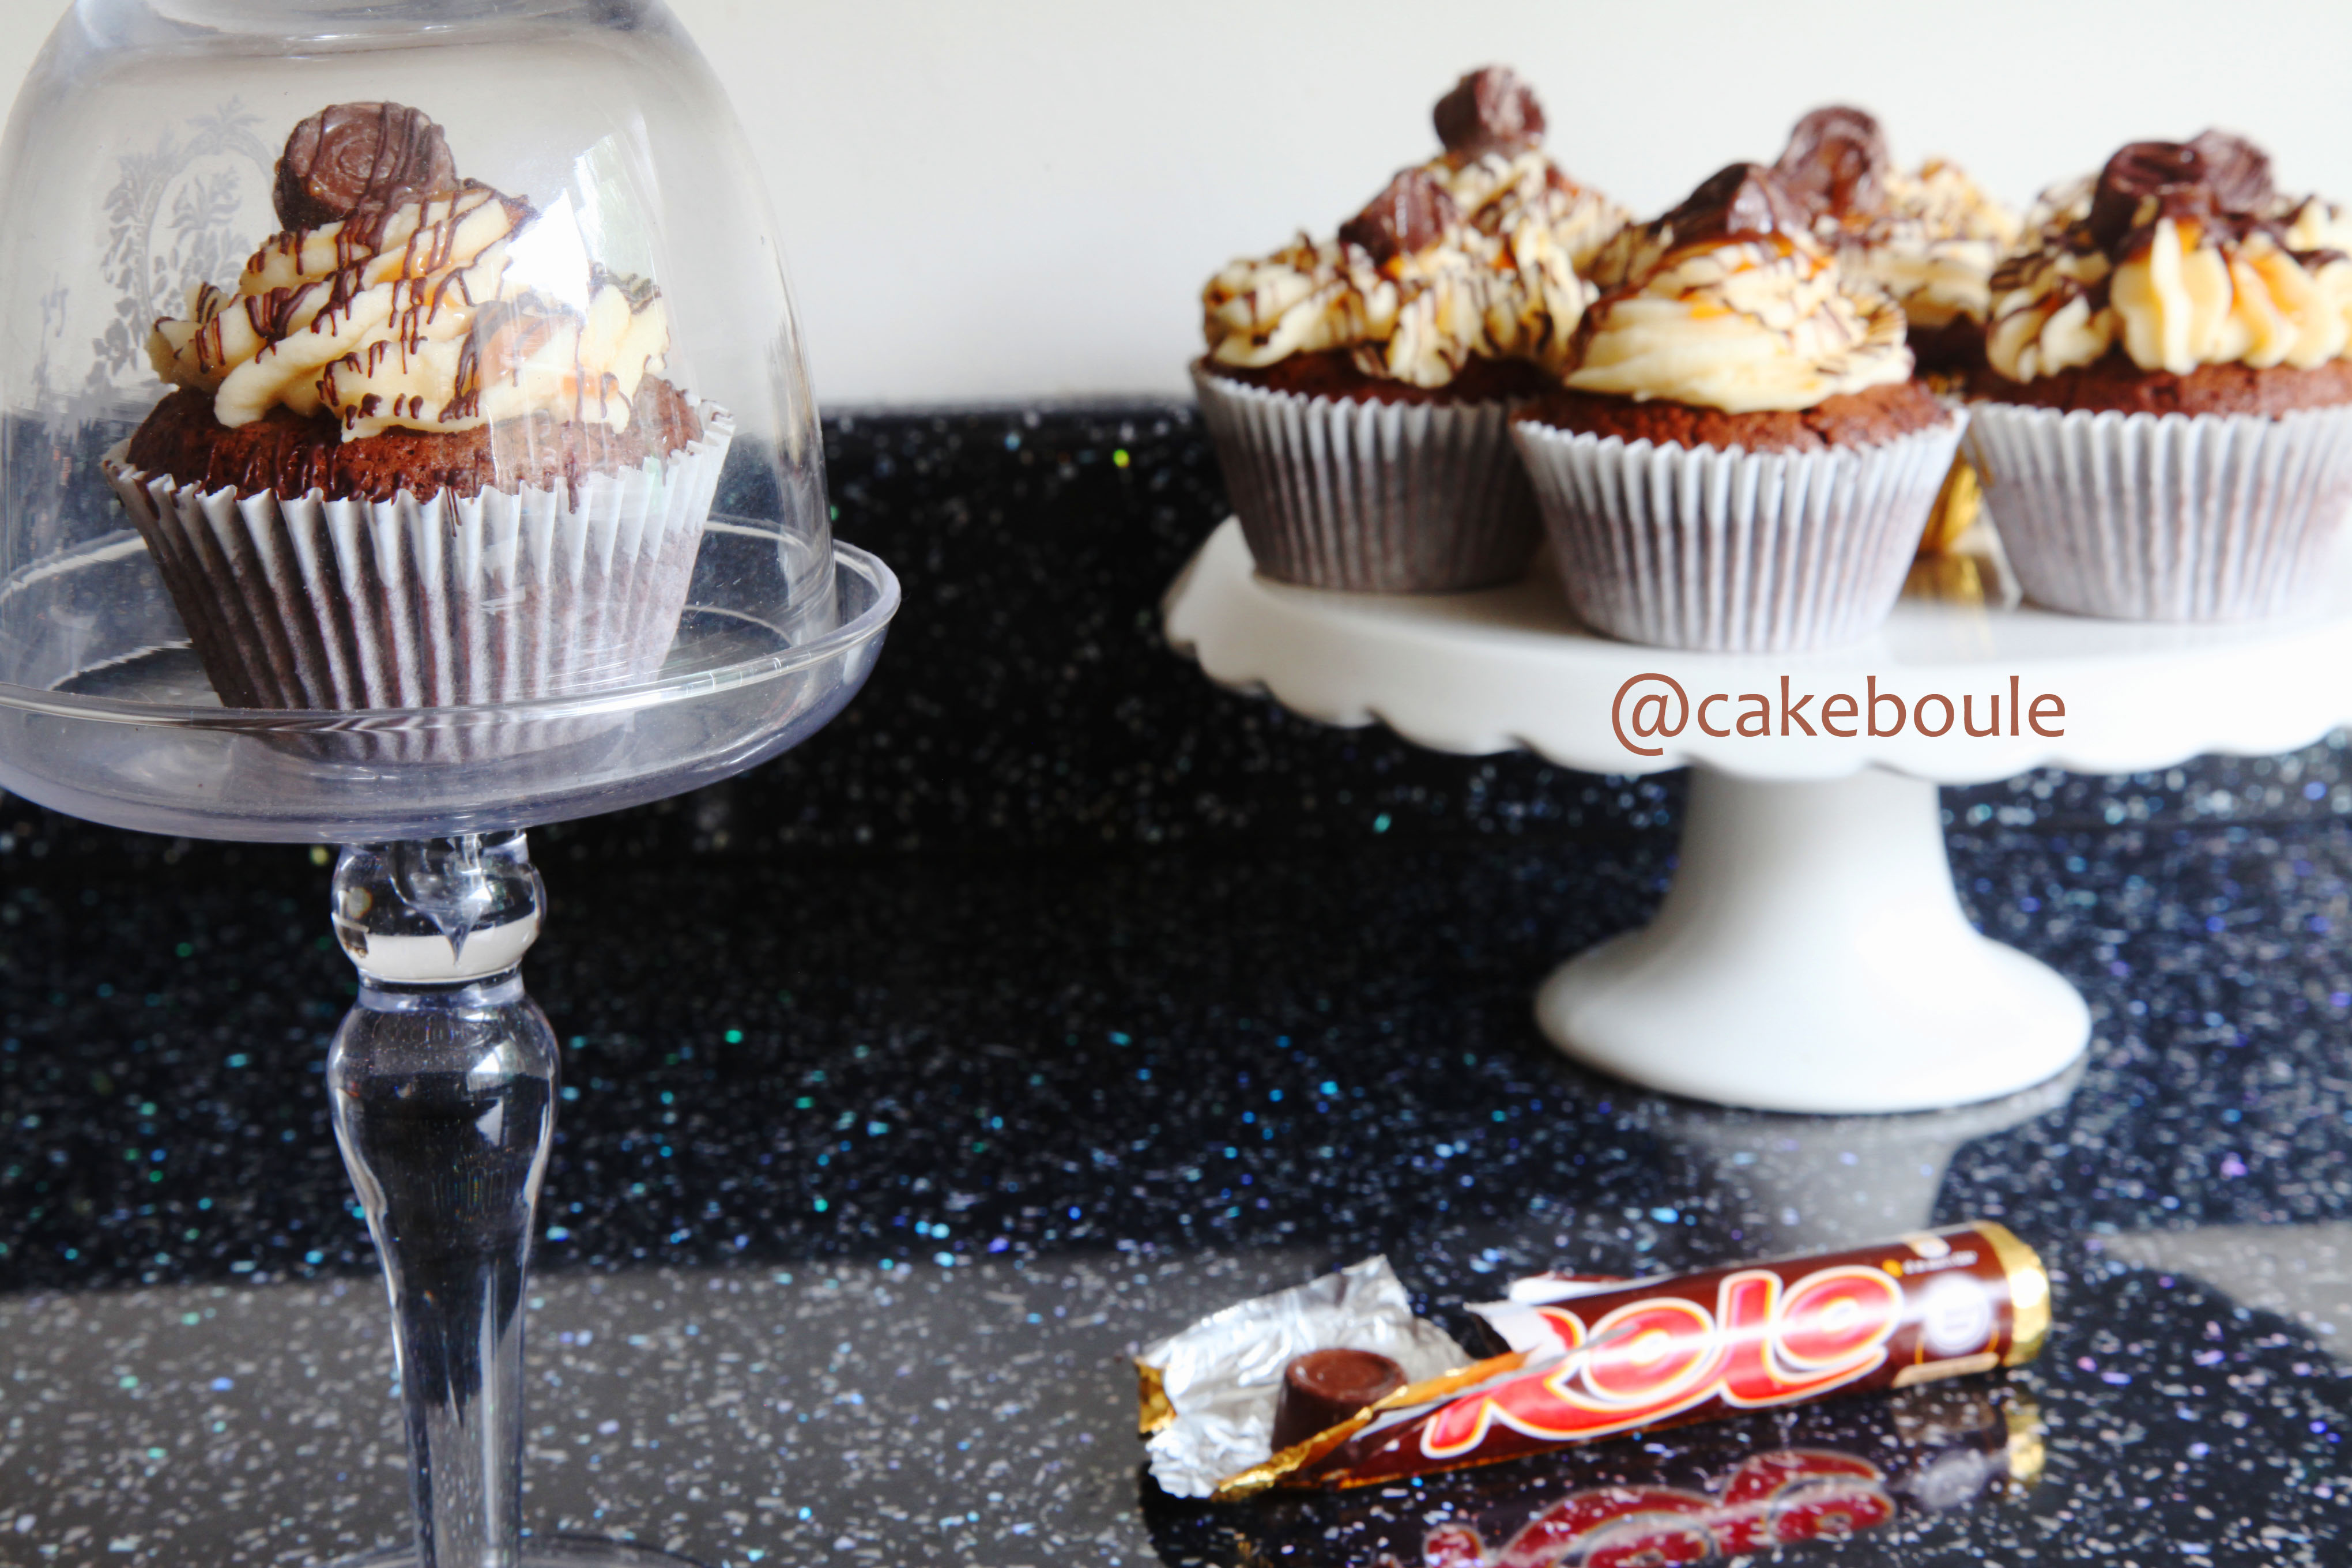
I’ve been playing ‘hide and seek’ with cupcakes and it’s great fun! For the game to work I baked chocolate fudge cupcakes baked with rolo inside adorned with lashings of caramel buttercream.

Rolo Chocolate Cupcake

The Rolo hidden inside was what I hoped would make them a hide and seek cupcake. Although I froze the Rolos for 24 hours before hand in the hope they would remain somehow intact inside the cupcake sadly they didn’t but who cares when your welcomed by an explosion of moist fudgy chocolate cake.

Rolo Chocolate Cupcake

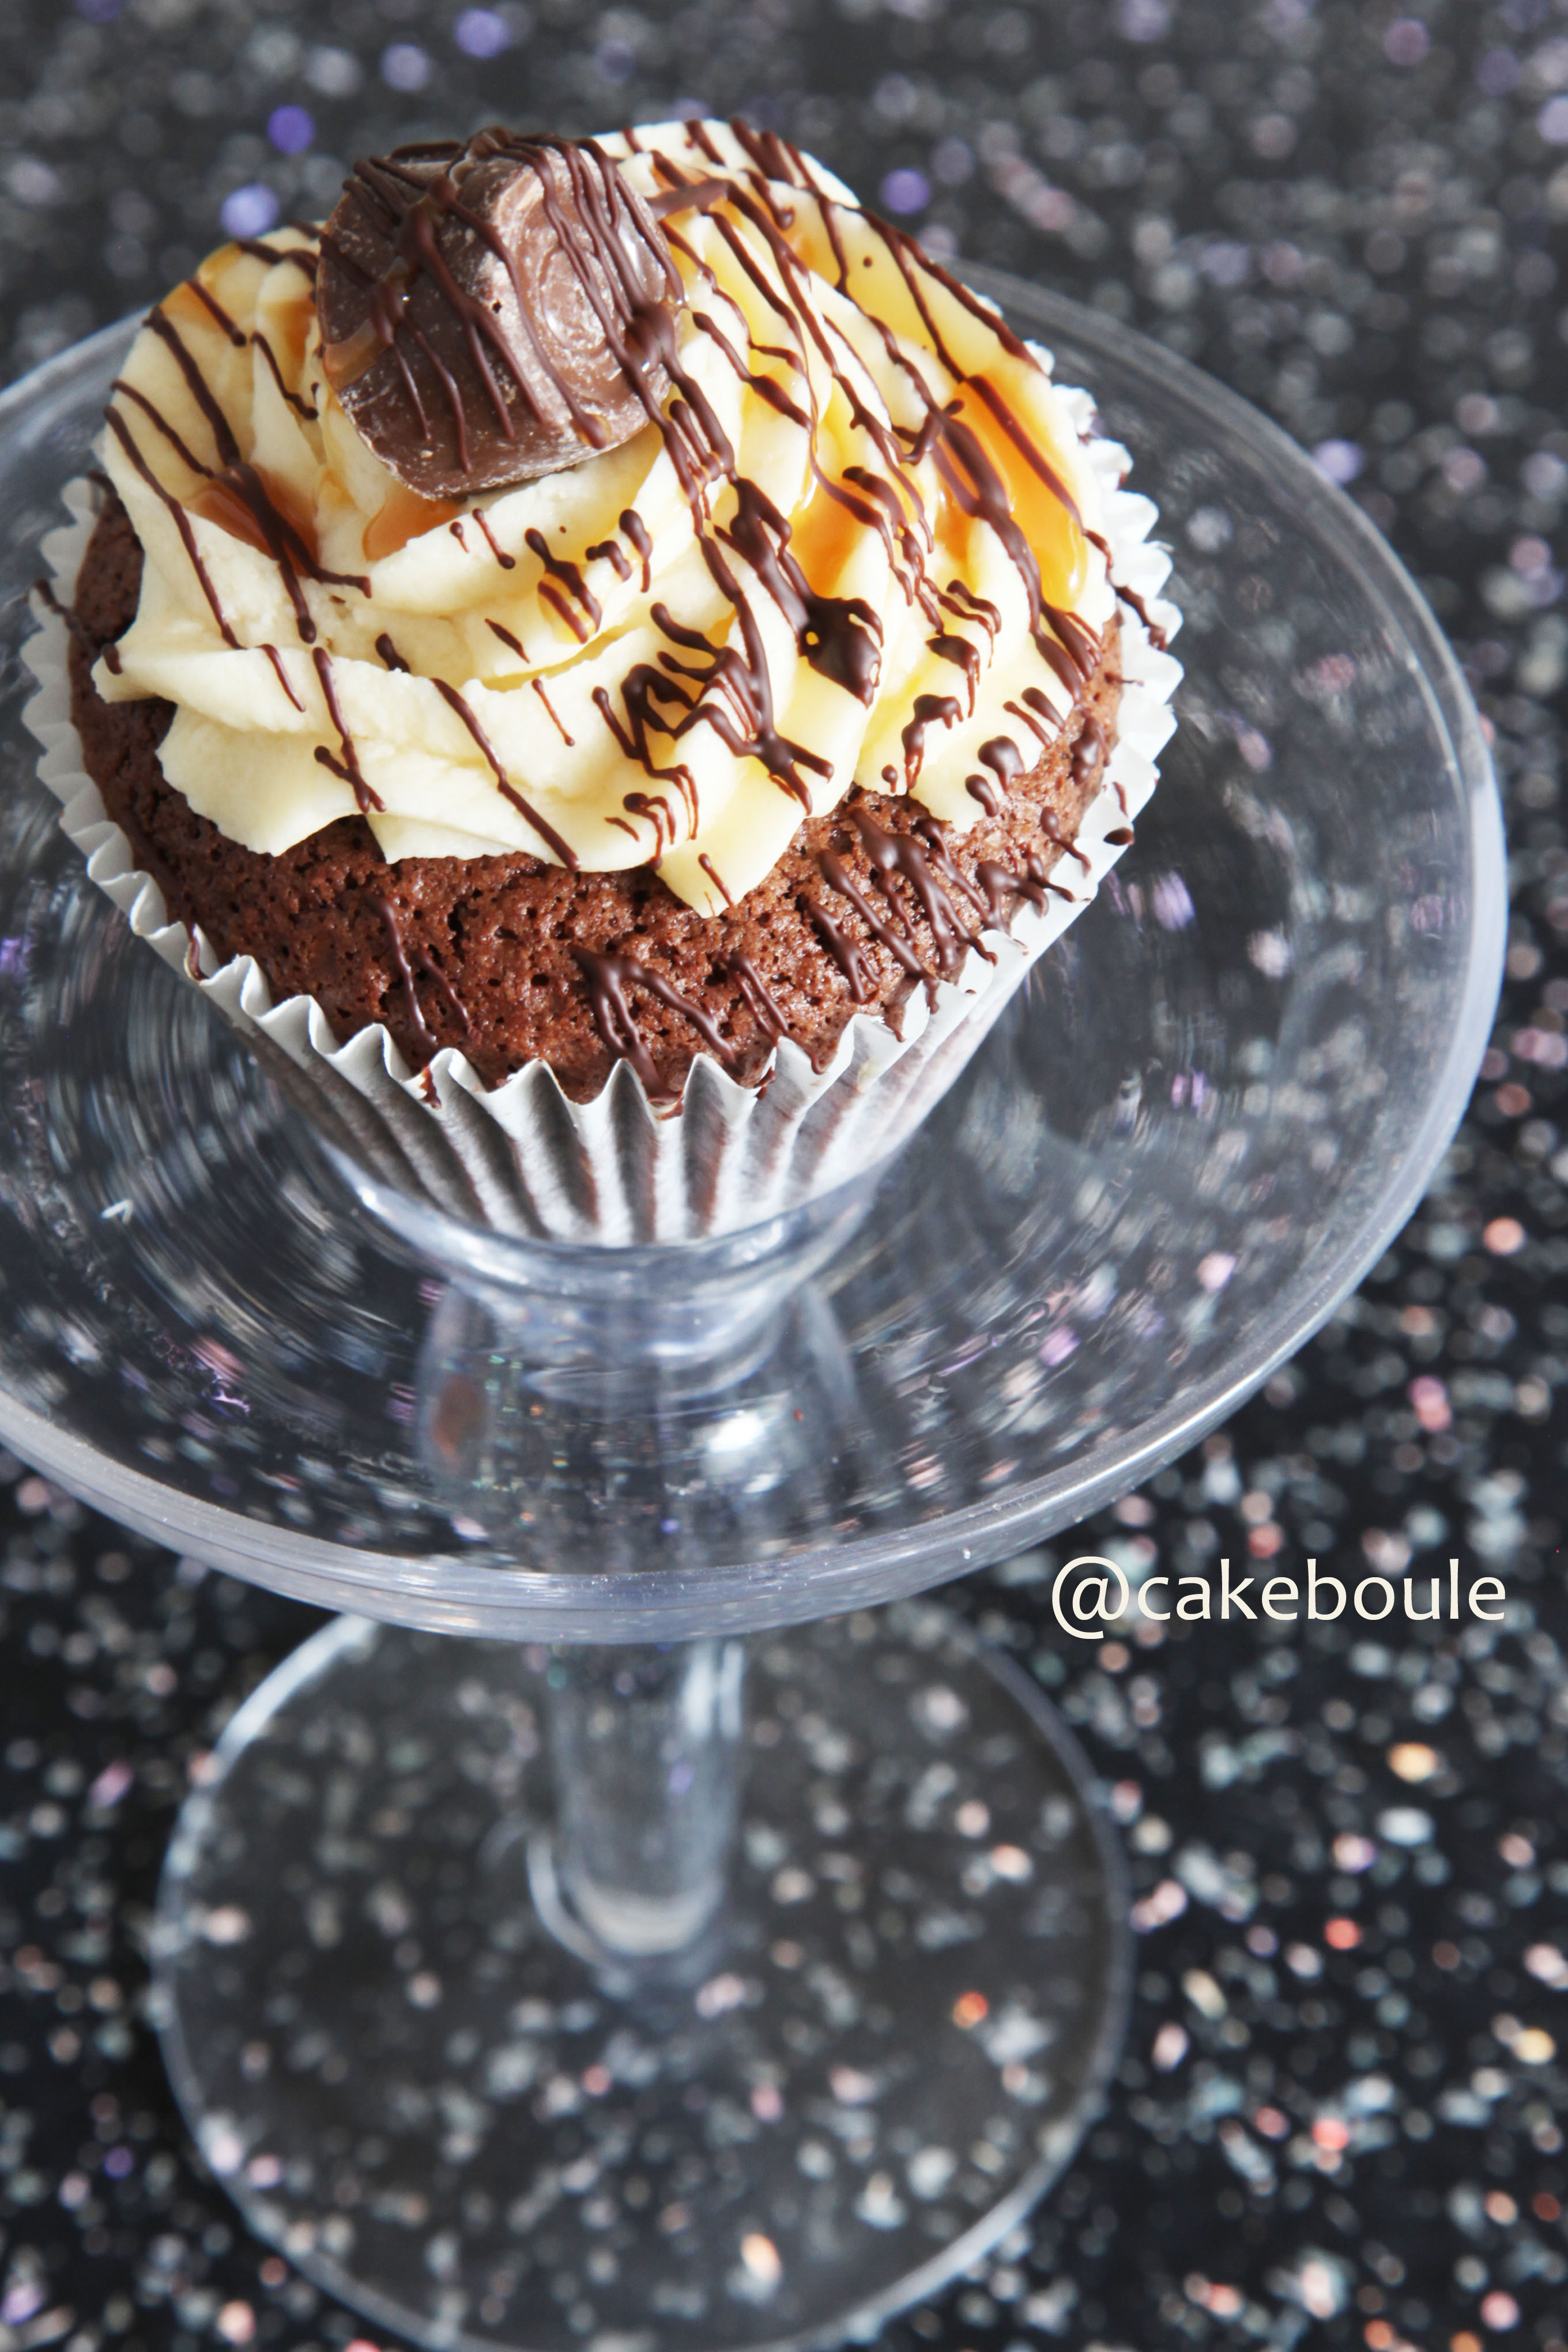
Homemade caramel was added to the buttercream and then drizzled with chocolate and caramel sauce and of course a Rolo completed the ensemble.

Rolo Chocolate Cupcake

Then the fun began! Yes fun! I had to write it twice to remind myself as life rang me the other day:

“Excuse me I’m looking for fun.”

Err, I don’t know where she’s gone?” I replied whilst looking up at the ceiling wondering if she was perhaps hanging off there with the remnants of mis-tossed pancake. “Perhaps she’s gone out with childhood wonder and laughter to play.”

“Hmmmm,” Life replied. “When she gets back get her to give me a call”

“Oh, OK.” I sang before a forceful slam reverberated in my ear drum which signalled the end of the conversation.

It was then I realised fun, wonder and laughter must have got bored waiting and gone off exploring without me. After sulking for a few days I had an ephinay of sorts. I could find fun again, yes it might take some work but I was sure I could track them all back down eventually. I set myself a challenge for three weeks as I believe things should and do always come in threes. This challenge would be based on me, us and them. For me: I wanted fun back even more than ‘twihards’ want Edward to show up in their living rooms so they can breathe ‘bite me you sexy beast’.

So I set about wondering and came up with this:

  1. Could I bake a Rolo inside a cupcake and it still be whole?
  2. Is it possible to play a game involving cupcakes?
  3. Could I find fun, bring her back and share her with my Husband and teenage son?

The answer was no, yes, yes in that order. The hide and seek cupcake game is easy with two variations:

  1. Hide cupcakes around the house whichever are not found are yours so hide well and give them a time limit to find them. Hmm about 10 seconds seems fair.
  2. Set a 007 challenge to overcome household obstacles in a race against the clock to find the cupcake in 70 seconds and return back to the starting point and sing the 007 theme tune. If you haven’t seen the coke zero version of 007 challenge you must watch it for inspiration! Think locked doors, chairs, discarded toys, rogue shoes and people getting in your way so pretty much like a normal day but with cake.

They both moaned initially when they realised they had to play a game to get their cupcake but when the countdown started they couldn’t stop their little faces lighting up. You see there is nothing loved more by men than a challenge which involving man V food.

From this challenge I learnt that fun is still out there and although admitedly she just pops in every now and then I aim that one day she might stay a bit longer until the day she moves right back. When you have fun you might notice that the other people in your life seem happier too and when you share the fun you get to witness that sparkle appear back in their eyes that you forgot existed. I’m not quite at the end of my three week challenge but it makes me wonder what else can I do for 21 days?

Try it out yourself: give yourself permission to go and play ‘hide and seek’ cupcakes and find out that fun might just be waiting patiently for you to invite her back in.

Ingredients for Chocolate Fudge Rolo Cupcakes

130g room temperature butter
3 fl oz / 95 ml of boiling water
3 tsps strong coffee granules
75g Self raising flour
75g plain flour
30g cocoa powder
¼ tsp bicarbonate of soda
300g caster sugar
2 eggs (room temperature)
5 tbsp sunflower oil

70ml sour cream

Chocolate Fudge Rolo Cake Instructions

  1. I froze my rolos for 24 hours (but up to you if you wish)
  2. Preheat the oven
  3. Line a muffin tin with liners (my mix made 13 cakes so I left one to bake later)
  4. Mix coffee with boiling water and add to a pan with butter and chocolate
  5. Heat the mixture gently to melt
  6. Sift all dry ingreadients into your mixer bowl
  7. In a bowl combine and mix eggs, oil and courcream
  8. Add both the egg and chocolate mixture to the dry ingreadients
  9. Mix on low (2 for Kitchen aid) until combined
  10. Add approx 2 tbsp of mixture (I use a cookie scoop)
  11. Add one rolo in the centre of each and top with further tbsp. to cover the rolo
  12. Bake in the oven for 20-25 mins until the top springs back when touched or cake tester is clean
  13. Leave to cool in the tin

Caramel Buttercream Ingredients

125g caster sugar
4 tbsp of water
80ml double cream
½ tsp of salt (optional but does bring out the flavour)
1 tsp of vanilla essence
160g butter
200g icing sugar
2-3 tbsp of milk (if needed to make the buttercream lighter for piping)

Caramel Buttercream Instructions

  1. Heat the sugar and water in a pan until the sugar has disoloved
  2. Continue cooking until it turns a golden colour and thickens slightly
  3. Remove from heat and add cream be aware it may splutter so be careful
  4. Stir and leave to cool
  5. Cream butter and icing sugar for 5-6 mins (Kitchenaid gradually increase to speed 6 once combined)
  6. Add caramel and beat until combined (reserve some caramel to drizzle over your cupcakes)

To Assemble

Pipe or cover your cupcakes with lashing of caramel buttercream, drizzle melted chocolate and caramel over the top and adorn with a Rolo. Then go and hide them, trash the house and set the timer 🙂

Gooey Popcorn Bars (Gluten Free)


Say sod it and call a movie night with a gooey, toffee, marshmallow and chocolate covered popcorn bar in hand.  Seek pleasure watching the silky caramel strands form as you pull the bars apart. This is a quick tray bake but with no baking (bonus!) but guaranteed to brighten up the dull and miserable summer we are having and great for big kids parties.

Popcorn Bars

I have never made popcorn before and I was more than a little bit excited when I saw fluffy white clouds pinging around my saucepan. Truthfully I was that excited I had to call the entire family to watch a miracle in the pan. If you have never made popcorn before then you truly have not lived.

Popcorn Bars

This recipe is an adaptation of my toffee crispie treats. After spending days discussing films set in New York with a friend I am now eager to sit down with one of these next week watching chick flicks to my hearts content so go on let it rain see if I care.

Popcorn bars

Of course you can top them with anything you like as this is an easily adapted recipe. I like the idea of twix or malteaser topppings or give it blast with some popping candy a la Heston style.

Popcorn BarsThe cat loved them too as he sauntered into the photograph, sniffed and then bit my finger!

Popcorn Bars

Enjoy!

Ingredients

250g toffees (Sainsbury’s Basics)
50g butter (room temperature)
3 tbsp of milk
1 tbsp of golden syrup
115g marshmallows
80g popped popcorn

Instructions

1. Brush your a 20cm square tin (or other suitable) with baking spray or oil and wipe with a kitchen towel to make sure it is not too oily.
2. Add toffee, golden syrup, butter and milk into a saucepan and heat gently.  Stir the mixture as it heats until all the ingredients have melted.
3. Add marshmallows and stir until they have melted.
4. Add the popcorn to the pan and make sure it is well coated with the toffee mixture
5. Pour quickly into prepared tin and flatten it down well with the back of a wet wooden spoon.  Add whatever toppings you fancy by pushing them down gently into the mixture so they set into to it.
6. Leave to set (about an hour) and cut into sizes required and eat (one is not enough) they will keep for about 5 days if they get that long in an air tight container. Do not place in the fridge or the pocorn will go soft.

Up next – Pay Day Cake 6 time!!!! (see previous here)

I am entering this into the Teatime treat competition hosted by the talented Karen from Lavender and Lovage and the theme this month is cake stall cakes and I think this will fit quite nicely.

Coffee, Vanilla Latte and Caramel Layer Cake – The Machiatto


This is my pay day cake – the cake that rewards me for making it to the end of the month and indulges me with my own piece of cake land heaven (sigh).

Coffee Vanilla Caramel Macchiato Cake

In honour of feeling knackered this month I wanted to create a ‘Macchiato’ which is a coffee drink found in Starbucks consisting of espresso, milk. froth and drizzled with caramel. So I set out to recreate this in cake form that will last longer then a coffee (well maybe?) but will still give a coffee buzz and a sugar rush. It had to be big and as I enjoyed making my Tiffany inspired chamapgne layer cake earlier in the year I knew I wanted to make another one.

Coffee Vanilla Caramel Macchiato Cake

Inside this layer cake there are four layers of espresso flavoured coffee cake one layer earnt for each week worked.  I think a pay day cake should be desirable and luxurious with no saving pennies or calorie counting allowed as it is a once a month treat.

Coffee Vanilla Caramel Macchiato CakeEach coffee liquor soaked layer has lashings of rich dulce du leche caramel and vanilla bean latte buttercream.  The entire cake is bathed with swirling layers of buttercream and edged delicatley with dulce du leche caramel.

Of course the best thing about going out to Starbucks is usually a toss up between the silky caramel drizzle or the little caramel wafers on top of your cup that go all gooey with the heat.

To make the experience as close as possible my ‘Macchiato’ layer cake has these butter toffee wafers too, after all this is pay day cake and I want to have it all for a moment before going back to basics next week.

Coffee Vanilla Caramel Macchiato Cake

I like this idea so much I think I will make myself a pay day cake each month.  Want a bite? Go on…

Macchiato Coffee Vanilla Caramel Cake

Ingredients for Coffee Cake

400g Butter (room temperature)
400g Caster sugar
400g Self raising flour / cake flour
8 Eggs (room temperature)
2 tsp Homemade vanilla extract (or use good quality)
4 tsp of Espresso instant powder (or to your own taste)
Water to make up 50ml of coffee
1 tin of dulce du leach / caramel (this will be used for the filling later – I use Nestle)

Preheat the oven to 150 / 315F / Gas 2-3 or 140 fan

  1. Grease and line two 8inch / 20cm deep cake tins (I use silverwood)
  2. Combine the butter and sugar in a bowl and beat until fluffy and pale in colour (about 5 mins)
  3. Add two eggs and mix until combined
  4. Add half the flour and mix until combined
  5. Repeat with the remaining eggs and flour
  6. Make up the espresso with 4tsp of coffee added with enough water to make 50 ml
  7. Add vanilla extract and mix for the least time until the flavours are mixed in
  8. Pour the batter evenly into two tins (you can weigh the mixture)
  9. Place in the middle of the oven and bake for approx 50 mins or until cake is springy to the touch and a cake tester / skewer comes out clean.
  10. Leave in the tin to cool

Layering the Cakes

  1. Once cool – cut the top edge off each cake to make it level
  2. Measure the height of your cakes to work out equal layers
  3. Slice each cake in half horizontally to make four layers  ( I use a serrated knife to do this – I go around the sides of the cake first before then taking the knife across the remaining middle section to get a clean layer – see the video on the tiffany inspired champagne layer cake for this)

Ingredients for Coffee Sugar Syrup
45ml coffee liquor (or use espresso mix again)
3 tbsp of homemade vanilla sugar (or you can use any type of brown sugar)

Heat the coffee liquor and sugar in a small pan until the sugar has dissolved
Brush the mixture evenly onto each cake layer

Vanilla Bean Latte Buttercream
400g softened butter
800g icing sugar
6 tbs milk
4tsp instant espresso powder
2 vanilla beans (seeds scraped out)
2 tsp homemade vanilla essence (or other good quality)

  1. Cream the butter and  milk until light and fluffy
  2. Add the icing sugar and continue beating until it is well combined and light and fluffy in texture
  3. Add the espresso powder to the 2 tsp of vanilla extract and pour into the buttercream mixture
  4. Add the beans / seeds from 2 vanilla pods and add to the buttercream mixture
  5. Mix for the final time until all flavouring is well combined
  6. Use straight away or if putting it in the fridge remember to allow at least an hour for it to come fully back to room temperature so it is soft enough to pipe

To Assemble the Cake

Add a dollop of buttercream to the centre of your cake stand and then add your first layer of cake and press down – this will keep your cake in place.

Layer your cake in this order

1st layer – caramel
2nd layer – buttercream
3rd layer – caramel

  1. Use a palette knife to spread out the fillings and make sure you don’t go right to the edge or the caramel is likely to ooze down the sides of your cake.
  2. Add a very thin coating layer of buttercream using a palette knife all over your cake (don’t worry what it looks like) and place in the fridge for 30 mins so the buttercream can firm up.  This will stop crumbs getting into your icing.
  3. After 30 mins use a large palette knife to ice your cake all the way round (again the video on the tiffany layer cake is very good at showing you this).  Iit is much easier if you have a cake turntable – I do not have one but I do have a lazy susan (revolving circle wooden board) so I used that and it worked perfectly!
  4. To get the same effect with the buttercream as I did you need a small palette knife placed flat on the side of the cake at the bottom.  Hold the palette knife and move the cake round on the turntable until you reach the top.  It is like running your finger round and round your cake.
  5. I then used a palette knife loaded with dulce du leche and went round the same pattern gently to add a touch of caramel to the layers.
  6. Make a criss cross on the top of the cake with caramel (just like they do in Starbuck) and pipe buttercream on the top in what ever formation you like – top with a butter toffee wafer and get ready to eat.

This cake will last well in an airtight container for a few days.  I also entered into the fantastic Alphabake Challenge for March and this month’s letter is M.  The challenge in kindly hosted by The More than Occasional Baker and this months host Caroline Makes.

Enjoy! x