Rolo Cupcake Challenge


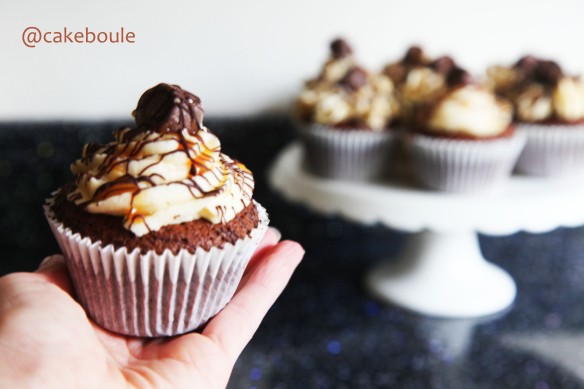
I’ve been playing ‘hide and seek’ with cupcakes and it’s great fun! For the game to work I baked chocolate fudge cupcakes baked with rolo inside adorned with lashings of caramel buttercream.

Rolo Chocolate Cupcake

The Rolo hidden inside was what I hoped would make them a hide and seek cupcake. Although I froze the Rolos for 24 hours before hand in the hope they would remain somehow intact inside the cupcake sadly they didn’t but who cares when your welcomed by an explosion of moist fudgy chocolate cake.

Rolo Chocolate Cupcake

Homemade caramel was added to the buttercream and then drizzled with chocolate and caramel sauce and of course a Rolo completed the ensemble.

Rolo Chocolate Cupcake

Then the fun began! Yes fun! I had to write it twice to remind myself as life rang me the other day:

“Excuse me I’m looking for fun.”

Err, I don’t know where she’s gone?” I replied whilst looking up at the ceiling wondering if she was perhaps hanging off there with the remnants of mis-tossed pancake. “Perhaps she’s gone out with childhood wonder and laughter to play.”

“Hmmmm,” Life replied. “When she gets back get her to give me a call”

“Oh, OK.” I sang before a forceful slam reverberated in my ear drum which signalled the end of the conversation.

It was then I realised fun, wonder and laughter must have got bored waiting and gone off exploring without me. After sulking for a few days I had an ephinay of sorts. I could find fun again, yes it might take some work but I was sure I could track them all back down eventually. I set myself a challenge for three weeks as I believe things should and do always come in threes. This challenge would be based on me, us and them. For me: I wanted fun back even more than ‘twihards’ want Edward to show up in their living rooms so they can breathe ‘bite me you sexy beast’.

So I set about wondering and came up with this:

  1. Could I bake a Rolo inside a cupcake and it still be whole?
  2. Is it possible to play a game involving cupcakes?
  3. Could I find fun, bring her back and share her with my Husband and teenage son?

The answer was no, yes, yes in that order. The hide and seek cupcake game is easy with two variations:

  1. Hide cupcakes around the house whichever are not found are yours so hide well and give them a time limit to find them. Hmm about 10 seconds seems fair.
  2. Set a 007 challenge to overcome household obstacles in a race against the clock to find the cupcake in 70 seconds and return back to the starting point and sing the 007 theme tune. If you haven’t seen the coke zero version of 007 challenge you must watch it for inspiration! Think locked doors, chairs, discarded toys, rogue shoes and people getting in your way so pretty much like a normal day but with cake.

They both moaned initially when they realised they had to play a game to get their cupcake but when the countdown started they couldn’t stop their little faces lighting up. You see there is nothing loved more by men than a challenge which involving man V food.

From this challenge I learnt that fun is still out there and although admitedly she just pops in every now and then I aim that one day she might stay a bit longer until the day she moves right back. When you have fun you might notice that the other people in your life seem happier too and when you share the fun you get to witness that sparkle appear back in their eyes that you forgot existed. I’m not quite at the end of my three week challenge but it makes me wonder what else can I do for 21 days?

Try it out yourself: give yourself permission to go and play ‘hide and seek’ cupcakes and find out that fun might just be waiting patiently for you to invite her back in.

Ingredients for Chocolate Fudge Rolo Cupcakes

130g room temperature butter
3 fl oz / 95 ml of boiling water
3 tsps strong coffee granules
75g Self raising flour
75g plain flour
30g cocoa powder
¼ tsp bicarbonate of soda
300g caster sugar
2 eggs (room temperature)
5 tbsp sunflower oil

70ml sour cream

Chocolate Fudge Rolo Cake Instructions

  1. I froze my rolos for 24 hours (but up to you if you wish)
  2. Preheat the oven
  3. Line a muffin tin with liners (my mix made 13 cakes so I left one to bake later)
  4. Mix coffee with boiling water and add to a pan with butter and chocolate
  5. Heat the mixture gently to melt
  6. Sift all dry ingreadients into your mixer bowl
  7. In a bowl combine and mix eggs, oil and courcream
  8. Add both the egg and chocolate mixture to the dry ingreadients
  9. Mix on low (2 for Kitchen aid) until combined
  10. Add approx 2 tbsp of mixture (I use a cookie scoop)
  11. Add one rolo in the centre of each and top with further tbsp. to cover the rolo
  12. Bake in the oven for 20-25 mins until the top springs back when touched or cake tester is clean
  13. Leave to cool in the tin

Caramel Buttercream Ingredients

125g caster sugar
4 tbsp of water
80ml double cream
½ tsp of salt (optional but does bring out the flavour)
1 tsp of vanilla essence
160g butter
200g icing sugar
2-3 tbsp of milk (if needed to make the buttercream lighter for piping)

Caramel Buttercream Instructions

  1. Heat the sugar and water in a pan until the sugar has disoloved
  2. Continue cooking until it turns a golden colour and thickens slightly
  3. Remove from heat and add cream be aware it may splutter so be careful
  4. Stir and leave to cool
  5. Cream butter and icing sugar for 5-6 mins (Kitchenaid gradually increase to speed 6 once combined)
  6. Add caramel and beat until combined (reserve some caramel to drizzle over your cupcakes)

To Assemble

Pipe or cover your cupcakes with lashing of caramel buttercream, drizzle melted chocolate and caramel over the top and adorn with a Rolo. Then go and hide them, trash the house and set the timer 🙂

Take a break from the grey and bake


2012 is officially the colour of Grey. Floods and continual grey skies create the perfect reading opportunity for stuck indoors women in their millions to one by one drop like flies and seek comfort in the arms of the infamous Mr Grey. I can’t go anywhere without hearing constantly  ‘I’m spending the night with Christian’, ‘I got the last copy whoop whoop’ and my personal favourite ‘I wrestled the woman in Tesco’s for it and won’    Honestly all this grey has turned my female social media friends into whipping, drooling and silk scarf frenzied sex kittens.  As with all good things Ladies you have to take a break some time or bits start to fall off so walk away from Grey and Greyer, give your racing hearts and imaginations a rest. If you really have a need to tie yourself to things that’s fine just tie yourself to the food mixer or oven door and get it over with. You all have to eat sometime so join me in my top ten round-up of bakes over the year and I hear the naughty chocolate fudge sauce is good if that’s your sort of thing.

Number One – Strawberry Pimms Cake Pop Truffles

Pimms Cake Pops / Truffles

Pimms Cake Pops / Truffles

This is where it all began and I really enjoyed making these and I think at the time that was probably because at the beginning it did not matter if the cake I baked was wonky or imperfect as it got smooshed up with various fillings to create a mouthful of heaven. If you roll cake balls in meringue before dipping them in chocolate you have an Eton mess variation and perfect for when you need something ball shaped that isn’t salty.

Two – The mis-piped naughty meringue snowmen

My piping disaster (keep on reading to see more!)

See these were a bit of a baking disaster and most of you who have spoken to me over the year will have chuckled at these.  I was not the best at piping back then and figured that the little snowmen rather naughty looking tails would go down in the oven.  Hmmm I guess I was wrong with that one however they will star on this year’s Christmas cards!

Three – Pay Day Cakes  ‘The Macchiato’

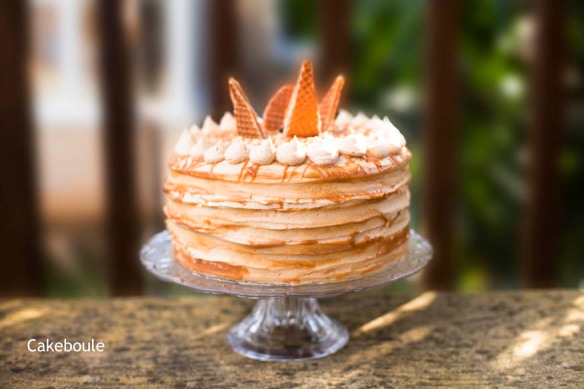
The ‘Pay Day Cake’ idea began in March with the premise that you do not scrimp on ingredients but bake a cake that has four layers in a celebration for each week worked. This one is the Machiatto based on the coffee, vanilla and caramel drink at Starbucks. After this followed Sticky Toffee Pudding Cake, The Turkish Temptress and White Chocolate Mousse cake with a secret berry blast that will keep your admirers wondering how you did it? The final cake so far is triple chocolate mousse cake with chocolate covered strawberries – do I pick the longest names or what? What next a fifty shades of grey cake how would that work?

Sticky Toffee Cake

 FourVanilla Essence (DIY)

Homemade Vanilla Essence

A great gift to you or a baking friend – why not make a few at the same time.

This has to be on the list as it is the one ingredient I use in all of my bakes – simple to make, full of flavour and saves £££ and if you add lemonade to a shot of it you have a vanilla vodka spritzer – love the dual purpose nature! Comes with a humourous tale of baking meltdowns.

FiveMojito inspired Polenta Cake

Mojito polenta cake

Polenta cake – this is a dairy and gluten-free option you know you will be safe most places you need to take cake. Moist, tangy, easy to make and very portable with no fussy icing to worry about – bake it and job done and if you like it try the lemon and berry version.

SixJammie Dodger CheesecakesJammie Dodger Cheesecake

Perfect little pick me up with a creamy cheesecake, jamminess and biscuit all rolled into one. You would think a soft biscuit base wouldn’t work but it really does and cute too.  Comes with a tale about synchronicity.

Seven – Raspberry Bakewell Cake

Raspberry Bakewell Cake

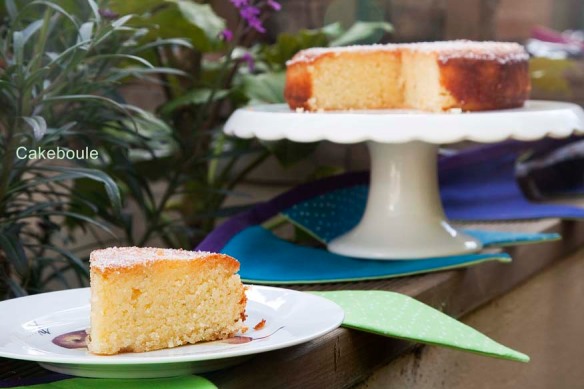
Another dairy and gluten free cake (but you would never know) that is just as good as a Bakewell tart but far less hassle. I have a love of simple loaf cakes and my top tip is buy cake liners for your tins to save time from fiddly lining with baking paper. Why not try out Left over Banana, honeycomb and chocolate or Lemon and Blueberry.

EightNaughty Chocolate Fudge Sauce

Just perfect for pouring over ice-cream sundaes, traybakes, puddings or whatever else takes your fancy but I don’t want to know about it thank you very much. Keeps in a jar in the fridge and then just heat and pour over your choosen dessert or body parts includes cute labels as well so you can give it as a gift but please don’t tie the labels to body parts as that would just be wrong.

Nine – Palmiers, Berries and Macaron Ice-Cream

Juicy berry Palmiers with ice-cream oozing with berries and crushed macarons which is the perfect use for them if they have gone hideously wrong as mine do. Accompanied by a funny story of blackberry picking disasters and walking like John Wayne but without needing Mr Grey to do that for me.

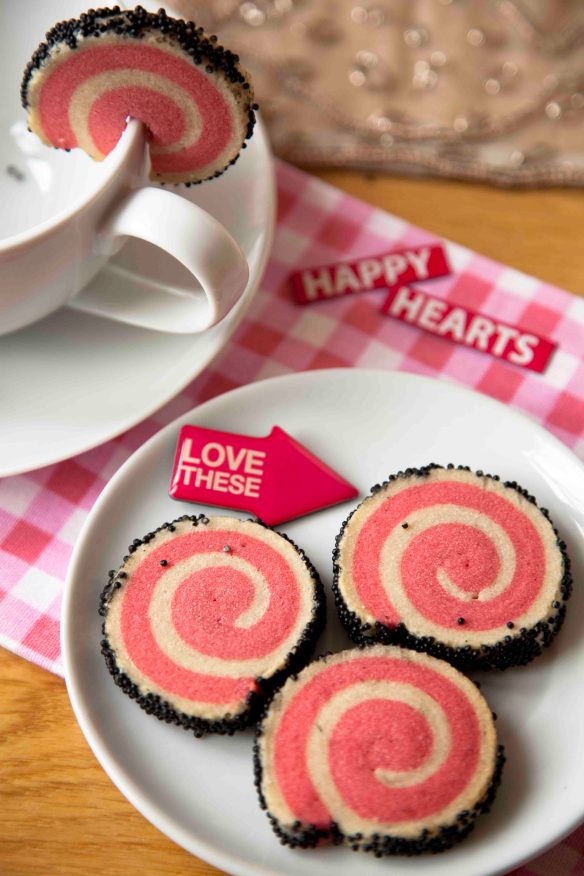
TenSprinkle Spiral Cookies

Made for Valentines day with love and such fun to hang on the side of cups (if you cleverly cut them as soon as you take them out of the oven before they begin to harden. Any colour or flavour would work with these and they freeze well so you can make ahead and bake when needed. I keep a frozen cookie roll in my freezer which also serves as a back up weapon to ward off any intruders. Please don’t get any ideas of putting cookie rolls anywhere they shouldn’t go as that would be a hard one to explain at the NHS walk in centre.

Hope you enjoyed my round-up and here’s to more bakes ahead. As for Mr Gey I’m avoiding you for the moment as my kitchen is my own version of a ‘red room of pain’ where I’m often found weeping in dispair, involunatrily tied up in piping bags or yelling with sheer baked ecstacy all without having read the trilogy.  Apparently there is expected to be a 50 shades baby boom which will lead to some interesting questions for those parents in the next decade.  I can imagine their conversations now, ‘Mum, how was I concieved?’ and the reply ‘Well Your Dad tied me to the Kitchenaid and I spanked him with the beater attachment whilst balancing a cupcake on my head’ oh dear Mr Grey what you got us into?

Thanks to all who have supported me, commented, followed and the extra pounds my close friends and family have endured so far in my little journey. What was your favourite?

Love to all x Up next gooey popcorn bars traybake

Sticky Toffee Pudding Layer Cake (Gluten Free)


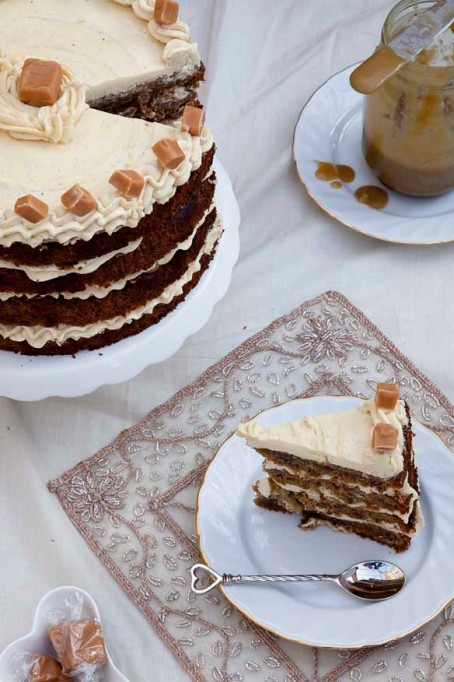
This is my second pay day cake as the first was the ‘Macchiatto’ espresso, vanilla and caramel layer cake and this month I wanted to create a sticky toffee pudding cake that was moist, not covered in sickly buttercream but smooth and silky in the mouth.  It was not easy to photogrpah this cake and it may look a lttle dark but I assure you it is not burnt just crammed full of dark rich dates.Sticky Toffee Pudding Cake by Cakeboule

My pay day cake idea revolves around creating a reward to celebrate the fact that I’ve been paid and made it to the end of another month as we should all be thankful if we have jobs these days. However I believe there is always an excuse that can be made for making or eating cake so that it does not need to be kept solely for Birthday celebrations, here are a few examples:

1. I love you cake (aka its all for me)
2. It’s Friday, Monday cake etc whatever day you want to celebrate
3. ‘I saved a fortune by getting all this in the sale’ cake (honest)
4. I put up with your snoring so I deserve cake
5. There is a celebration most days on google with a funky graphic so if you are really desperate use that as your excuse!

Sticky Toffee Pudding Cake by Cakeboule

You don’t have to go the full monty and make a four tiered layer cake as I do this to me as each layer represents a week worked. If you wanted to you could half the recipe and bake it a 20cm tin, cut in half and smother the middle it in sticky toffee sauce. Or you could heat it up, drizzle with more sauce and serve with ice cream for a delicious pudding. The bonus of a cake version is that is portable so you can have a sticky toffee hit where ever you go.

Sticky Toffee Pudding Cake by Cakeboule

This produces a dense moist cake but it is not overly sweet like you might expect as it uses a swiss meringue buttercream flavoured with the sticky toffee sauce. Unlike a normal buttercream (butter and icing sugar) swiss meringue buttercream is not as sweet so will need flavouring. The buttercream is a bit fiddly but not as bad to make as I thought it would be and the reward is a very smooth silky buttercream that knocks the socks off any other I have tried.

Sticky Toffee Cake

To Make this Gluten Free
I have made this gluten free a few times before with great success.  Simply substitute the self raising flour (see below) with gluten free self raising flour (I use Doves Farm). As this is a very moist cake it works well as a gluten free cake and needs no further moisture or xanthum gum. For more gluten free info – ready my 7 tips for gluten free baking here.

Ingredients (cake)
450g dates, pitted and chopped (soaked in 300ml water with 4 green tea bags or use ordinary tea bags)
2 tsp vanilla extract ( use my own version so I know it has no nasty stuff in it)
2 tsp mixed spice
360g self-raising flour
2 tsp bicarbonate of soda
230g unsalted butter, softened
350g light muscovado sugar
4 eggs, lightly beaten

Instructions for the Cake
1. Preheat oven to 180°C/fan oven 160°C/350°F/Gas mark 4.
2. Line 2 x 20cm round loose bottomed tin with greaseproof paper.
3. Using scissors cut up the dates into small pieces.
4. Put the dates and water into a large saucepan.
5. Bring dates and water to the boil and continue to cook uncovered for 8 minutes until dates have softened
6. Remove from heat, fish out the teabags – remember count them in and out as you don’t want to forget one – it’s just like being on a school trip.
7. Stir in the bicarbonate of soda – this may make the mixture froth so be careful.
8. Leave the date mixture cool on the side – although if you are impatient (like me) the cake will still work but it will melt the butter so it won’t be as fluffy and cake like.
9. Cream together the butter and sugar until smooth, pale and airy.
10.Beat in the eggs and add to the butter and sugar mixture. Add vanilla extract.
11. To the mixture in the flour and the e mixture (cooled).
12. Pour (as this is quite a liquid mixture) into the prepared baking tins and level the surface.
13. Cover the cake with foil
14. Bake for approximately approx 30 mins and then remove the foil ( to prevent burning) and bake for approx 10 minutes more. It is ready when the top is golden and the cake has begun to shrink away for the sides. It will still have a little bit of a wobble as the mixture is moist.
15. Leave to cool in the tin and transfer to a wire rack.
16. I always leave cakes that are being layered overnight in an airtight container wrapped in greaseproof paper so that they do not crumble when you cut them.

Ingredients for Sticky Toffee Sauce
120g light brown sugar
120g salted butter (but unsalted works just as well)
100ml cream (I used Elmlea half fat)

Instructions for the Sauce
1. Melt the butter and sugar in a saucepan over a low heat until the sugar has dissolved whilst stirring so the sugar does not burn. To check the sugar has dissoleved you can put a very small amount on your fingers and rub them together it should not feel gritty but be careful as it will be hot.
2. Stir in the cream and heat until gently bubbling – stir continually. Remove from heat and leave to cool.

Tip – You can always double the recipe and put it into an airtight jar and store in the fridge for toffee fudge sundaes in the next week – yum!

Swiss Meringue Buttercream (Adapted from Sweetapolita)
If you have never done swiss meringues before I urge you to read Sweetapolita’s article – swiss meringue buttercream demystified – it is a god send and made me feel far more confident that was until it curdled – but I have included how I fixed this later on in this article!

Ingredients
120g egg whites (I used liquid egg whites which you can buy in a carton from the Supermarket as they are pasturised)
200g granulated sugar
340g butter (soft but still cool)
1 tsp vanilla extract
1 Vanilla bean (seeds only)

Special equipment
Double boiler, baine marie / porriger pan or use a bowl over a saucepan – make sure this clean by wiping it with a lemon or vinegar
Sugar or jam thermometer

1. Beat your butter using a hand whisk and transfer to a seprate bowl for later.
2. Add about 1/2 inch of water in the bottom of the pan / bowl and add the egg whites and sugar to the pan / bowl
3. Whisk gently over a low heat until the egg whites reach 140C and then remove from the heat
4. Pour egg whites into mixer bowl and whisk on medium speed for five minutes. Continue on high until stiff peaks form. Keep whisking until the bottom of the bowl is no longer warm – this is really important as you do not want to melt the butter when you add it (this takes about 8 – 10 mins)
5. Add the butter one tablespoon at a time whilst still mixing and watch it until it has combined – continue in this way until all the butter has been added. If you mixture is soupy you did not wait long enough for the egg whites to cool – put the mixture back it the fridge and then try again in 15-20 mins. Is it curdled and yukkly? See below…
6. The mixture will come together to become light and fluffy – add the sticky toffee topping to your own taste – add a tablespoon of sauce (one at a time) whilst still mixing. Any left over sauce can be used over ice-creams for sundaes!

Dillema – The Swiss Meringue Buttercream Curdle (How to recuse it)
Yes I hit this problem and I kept mixing the buttercream like Sweetapolita tells you to do and have faith that all will be fine. After five minutes faith was leaving me, I tried putting it in the fridge, praying, beating it on high, low but none if it changed the fact that the SMB looked disgusting!

However I did find something that works on this site – take 1/4 of the mixture out and pour into a microwavable bowl – heat for 15 seconds and then stir it to get a smooth consistency before pouring it back into your mixture. Whisk again on a low-speed. This worked and I was so pleased to have saved the buttercream.

Toffee Swiss Meringue Buttercream

To Assemble the Cake

Cut each cake into two even layers (I use a tape measure to make sure each layer is evenly sized. I don’t have a cake stand that rotates but I do use a revolving cheese board stand but you could also uses a lazy susan to do the job. Add a dollop of buttercream to the centre of your stand and add your first layer of cake and press down – this will keep your cake in place while you work.

Assembly

1. Put half the SM buttercream into a large piping / pastry bag and use a large star open tip nozzle
2. Use a palette knife to spread out the sticky toffee sauce onto your first layer. Make sure you don’t go right to the edge or the sticky toffee sauce is likely to ooze down the sides of your cake.
3. Spread SM buttercream across the top of the sticky toffee sauce – again keep in from the edge
4. Pipe around the edge of your layer using and up and down (think waves at the sea) motion until you have gone round the entire cake
5. Add the next layer carefully so as not to squash the piping
6. Repeat until all layers are done
7. Cut up fudge pieces and add to the top if you wish

Sticy Toffee Pudding Cake

Important Storage Notes
This cake should be stored at room temperature which is fine if you used the pasturised egg whites. After a couple of days it will need to go back in the fridge if there is any left. However if you are putting in the fridge you will need to get the cake out and let it come back fully to room temperature or the icing will taste disgusting!

Hot Chocolate Fudge Sauce (Gluten Free)


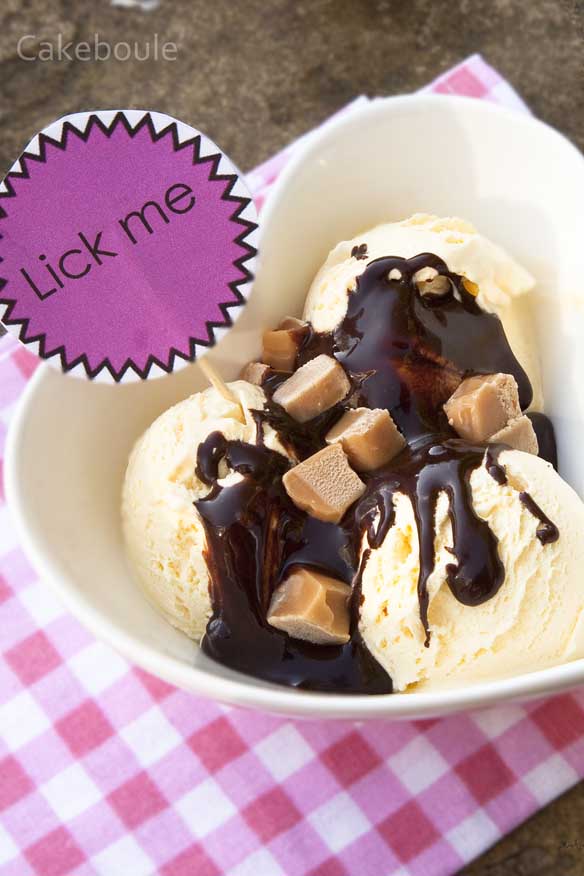
So Easter is over and no longer will we have to endure cute bunnies and eggs taking over the blog World.   If you want to use up your left over Easter eggs then try this  recipe for naughty hot chocolate fudge sauce which is perfect accompaniment to an ice-cream sundae and you can use up any left over easter eggs either in the sauce of by scattering them on top.

This sauce so my family tells me is rich, fudgy and as my son says ‘delish’.  It only took 20 minutes to make and would make a great gift coupled with a small bag of chocolate or fudge to give the gift of a Sundae.  A number of friends have told me I should go on Dragon’s Den with this recipe or sell it to Ann Summers for lickable body paint but I think not.  Of course what you do with the sauce in your own home is up to you.

You are probably wondering why I have not tried any of this sundae if it is so delicious?  Well,  milk and I do not see eye to eye.  In a chemical warfare battle between my stomach and ice-cream – the frozen stuff wins and it is just not worth it.  It was so hard to take these photographs and not lick the spoon or the bowl as I love ice-cream but it would have reaped its revenge on me.  Luckily I enjoyed watching my boys and the surrogate one (Ron) lick their spoons with glee so that made up for it.

The sauce will keep in the fridge for a few weeks (or more) if you use a sealed jar (e.g Kilner or Mason). To use the sauce just scoop the sauce you need into a bowl and heat in a pan or in the microwave for about 30 seconds on medium until it comes back to pouring consistency. I have included the jar label files (scroll down) so you can decorate your jars and make them look all pretty. Just print them out and glue them on I only used a glue stick as they are not going to stay on very long. I have included photoshop editing compatibility on the pdf for those who wish to edit and change the wording or colours – my gift to you.

You could also use the sauce on a cake between the layers for a chocolate fudge experience and heat it up and serve it with ice cream mmmmm.

The Geeky Hunt

I set my family an Easter Egg hunt where for each egg found they were given a binary number as I still on a binary kick (read chocolate & binary – trust me it is the best learning combination).  I can’t say they were initially thrilled at the idea as it required effort but no pain no gain I say and after all Mummy had been to Hotel Chocolat and therefore extra effort to gain these gifts were required.  Once they had worked out the decimal from the binary code (one per egg found)  they had to match the number to the letter in the alphabet (e.g 1 = A, 2 = B) then they had to put the letters in the right order to find out the location of their egg.  Ha ha I loved watching them try to figure it out 🙂 and I am so doing it again next year.

Ingredients (Hot Chocolate Fudge Sauce adapted from BBC Good Food)

To make this gluten or wheat free – use Green and Blacks Cocoa or Nestle – or check the manufacturers label. For more tips see my post – 7 tips for gluten free baking.
200g granulated sugar
140g vanilla sugar or use caster sugar and 1 tsp vanilla extract or 1 vanilla pod (seeds)
85g dark muscavado sugar
1/2 tsp espresso powder
100g cocoa (I use green and blacks)
30g cornflour
1 tin (410g) of evaporated milk
250ml water
50g butter cut into small cubes
2 tsp of vanilla extract (add at the end of cooking)

Instructions
1. Place all the ingredients into a large pan over a medium heat and stir constantly until you reach boiling point (approx 10 – 15 mins).
2. Continue cooking for a further 5 mins and the sauce will begin to thicken. Depending on how you like your sauce (thick or slightly runny) take it off the heat when you are happy with the pouring consistency. Add the vanilla essence.
3. If you are not using the sauce straight away you can pour into sterilised jars and add pretty labels.

The PDF labels (I have not done this before so please do not yell at me if this does not work!) I believe all you need to do is click on the link to open the file and then right click to save it (you will need a pdf reader).

PrintablesSml