Cakeboule has changed (Pink Lemonade Cake Anyone?)


What happened to Cakeboule?

Pink Lemonade Cake

Did she fall inside this cake?

Sadly I didn’t, but through writing this blog I discovered what I loved most (apart from the copious amounts of cake) and that is writing stories. My favourite story from this blog was ‘Tales and Gales from a VW Campervan’, the dreaded ‘wee wee’ walk will always haunt me. The post also showed a spooky image of me which fired my imagination and led me to write a fantasy novel.  I really enjoyed sharing my stories with you, and I am excited to say, this isn’t the end of Cakeboule (as such) it’s the beginning an exciting new journey as author ‘Jacqueline Jay’. I will confess I am luring you to come across and join me in my new world by offering you a Pink Lemonade Cake receipe as my parting gift . Read on to find out more…

I’ve had no cake for months (it was torture) because all of my time went into writing my first novel: ‘Instar’.

Image

Instar is a fantasy novel for young adults (or not so young – I love YA) and is book 1 of a series about stealing memories.

Blurb

Seventeen-year-old, Maia James’ world was blown apart when her Dad vanished.  That was four years ago, but her Mum still says she can’t remember what happened that night. Maia is convinced she’s lying, and all she wants to know –  is the truth.  Maia’s obsessed with memories because she’s plagued by cold shivers, which make her bones judder, and each time it happens, her memories seem to disappear, like someone is stealing them.  She was right; someone or something is…

You can see the book trailer (a work in progress) here or on my facebook page.

Pink Lemonade Cake!

You can still enjoy my random little tales over at www.jacquelinejay.com/blog and there will be the occasional receipe – one of my charachters ‘Mrs Aston’ makes an awesome chocolate cake and she’s baking obsessed ,so it seems fitting that I discover what sort of cake she would have made in real life.

Here it comes

My parting gift to my dear readers (here comes the catch!) is the recipe for ‘Pink Lemonade Cake’ which was the last cake I baked, and it’s worth a few clicks I promise as there is no other cake out there like it – this is my own creation. When I get over 150 likes on my facebook page then I will post the recipe on my new blog just for you as my farewell and welcome – don’t miss it – sign up for email updates now – you can easily cancel at anytime.  So here is the deal:

1. If you don’t want to miss my Pink Lemondae Cake reciepe – then add your email to my new blog www.jacquelinejay.com/blog where you will shortly find a collection of stories.

2. Feel free to join me once more by either or all of these social media places; twitter, facebook, pinterest ( where all of my receipes still live) or instagram

Look forward to seeing you soon x

SIgning off as Cakeboule and saying Hello Jacqueline Jay

Irish Coffee Cake


Irish Coffee Cake 1

As I sat drinking a break time coffee wishing it was an Irish version, I realised that within my daylight hours I resided in a regimented World punctuated by bells, demands and deadlines. On top of that I’ve two self-inflicted days of fasting followed by five days of visiting the ‘Land of eat whatever I fancy’. Life felt too controlled, I longed to be free even if just for 10 minutes so I hatched a cunning lunch time plan that involved:

  1. Desertion
  2. Crime
  3. Smuggling contraband

Irish Coffee Cake 4

That does sound grand, but you’ll be glad to know that the contraband was in the form of Irish coffee cake which is the most acceptable way to bring alcohol into the workplace (ooh I’m so naughty).

I tortured myself by making this cake on a fasting day; there was no licking of fingers, bowls or sneaky tasting therefore its success remained a mystery until the next day (I know I’m so hard-core in the self-torture department). When I took these pictures I had to wrap the cake slice up and yes that was very hard, I may have licked my computer screen just a little bit but don’t tell anyone.

Irish Coffee Cake 5

As the following lunch time at work arrived I threw off my goody two shoes veil to become a wicked woman about to take a walk on the dark side. I deserted my post, stole out of the confines and told myself I could just keep on walking if I didn’t feel any better after five minutes. Trees whispered, birds darted past and teenager’s feet stampeded for cover as I inadvertently walked past their secret cigarette lair all of which made me smile.

Irish Coffee Cake 2

I felt so much better that I turned back towards the hallowed halls. Feeling stronger I dared myself to commit a detention nominated crime by entering a clearly marked exit door and skipped up the one way only stairs. There was one mission left to complete as I crept back into my office trying to hide the flush of fresh air which had reddened my face. I pulled out the contraband, my hands shook slightly as I opened the foil hiding a cake cocktail* of rich coffee with Baileys white chocolate buttercream. The time was now, fast day was over and there was only two more minutes of peace before the bells tolled so I took a big bite and realised there is truth within the words ‘naughty but nice’. The cake tasted exactly as I imagined it, I felt like I’d been transported to a glitzy restaurant where I indulged in an Irish coffee over lazy chatter.

It’s the little things in life that matter, you’ll never say on your death-bed ‘I’m so glad I spent all those hours at work’ instead why not take just 10 minutes for yourself and be a little bit naughty next lunch time. Your work will be better due to lower stress levels which results in an increase in effectiveness and cake always boosts happiness so what’s to lose?

*always eat cake responsibly

Traditionally, Irish coffee consists of hot coffee, Irish whiskey, and sugar stirred and topped with thick cream I have altered this idea to fit my cake vision (fresh cream wasn’t that practical for transporting) but feel free to adapt it anyway you wish.

Irish Coffee Cake 3

Irish Coffee Cake

Coffee Cake Ingredients

400g Salted Butter (room temperature)
400g Caster sugar
400g Self raising flour
8 eggs
5 tbsp espresso ground coffee (instant) mixed with 3 tbsp of boiling water

Instructions for Coffee Cake

1. Pre heat the oven to 160 / 140 fan or Gas 3
2. Line two deep 20cm tins (do use the right size tins to avoid disaster)
3. Beat the butter and sugar until fluffy (5 minutes as this is what makes the cake rise so beautifully to get the full big cake wow factor so not skimp this part. I also find that using very soft butter (but not liquid) helps the creaming process)
4. Add the eggs two at a time and sift quarter of the flour into the mixture and beat until combined
5. Repeat until all eggs and flour are used up
6. Add coffee extract and mix
7. Place the tins in the oven on the middle shelf for approx 50 minutes (all ovens vary so check your cake after 45 mins)
8. Cakes are ready when the skewer can be inserted into the cake and it come out clean.
9. Leave in the tin for 5-10 minutes before removing and placing on a wire rack to cool

White Chocolate and Baileys Buttercream Recipe

250g Salted Butter (room temperature)
500g Icing sugar
250g White chocolate melted
125ml Baileys (or cheaper alternative!)

White Chocolate and Baileys Buttercream Instructions

1. Beat together the butter and icing sugar until light and fluffy
2. Melt the chocolate ( I do mine in 10 second stints in the microwave)
3. Let the melted chocolate cool slightly (10 mins)
4. Pour the chocolate into the buttercream mixture in small quantities beating as you do until all the chocolate has been incorporated.
5. Add the baileys and beat to combine one last time

Assembly of the Cake

1. Level the cake that will be the bottom layer
2. Smother the bottom layer of cake in buttercream and add the top layer of cake
3. Smother the top of the cake in buttercream, make spiking patterns with a palette knife
4. Cover with grated chocolate

      5. Eat and enjoy your naughty contraband

Rolo Cupcake Challenge


I’ve been playing ‘hide and seek’ with cupcakes and it’s great fun! For the game to work I baked chocolate fudge cupcakes baked with rolo inside adorned with lashings of caramel buttercream.

Rolo Chocolate Cupcake

The Rolo hidden inside was what I hoped would make them a hide and seek cupcake. Although I froze the Rolos for 24 hours before hand in the hope they would remain somehow intact inside the cupcake sadly they didn’t but who cares when your welcomed by an explosion of moist fudgy chocolate cake.

Rolo Chocolate Cupcake

Homemade caramel was added to the buttercream and then drizzled with chocolate and caramel sauce and of course a Rolo completed the ensemble.

Rolo Chocolate Cupcake

Then the fun began! Yes fun! I had to write it twice to remind myself as life rang me the other day:

“Excuse me I’m looking for fun.”

Err, I don’t know where she’s gone?” I replied whilst looking up at the ceiling wondering if she was perhaps hanging off there with the remnants of mis-tossed pancake. “Perhaps she’s gone out with childhood wonder and laughter to play.”

“Hmmmm,” Life replied. “When she gets back get her to give me a call”

“Oh, OK.” I sang before a forceful slam reverberated in my ear drum which signalled the end of the conversation.

It was then I realised fun, wonder and laughter must have got bored waiting and gone off exploring without me. After sulking for a few days I had an ephinay of sorts. I could find fun again, yes it might take some work but I was sure I could track them all back down eventually. I set myself a challenge for three weeks as I believe things should and do always come in threes. This challenge would be based on me, us and them. For me: I wanted fun back even more than ‘twihards’ want Edward to show up in their living rooms so they can breathe ‘bite me you sexy beast’.

So I set about wondering and came up with this:

  1. Could I bake a Rolo inside a cupcake and it still be whole?
  2. Is it possible to play a game involving cupcakes?
  3. Could I find fun, bring her back and share her with my Husband and teenage son?

The answer was no, yes, yes in that order. The hide and seek cupcake game is easy with two variations:

  1. Hide cupcakes around the house whichever are not found are yours so hide well and give them a time limit to find them. Hmm about 10 seconds seems fair.
  2. Set a 007 challenge to overcome household obstacles in a race against the clock to find the cupcake in 70 seconds and return back to the starting point and sing the 007 theme tune. If you haven’t seen the coke zero version of 007 challenge you must watch it for inspiration! Think locked doors, chairs, discarded toys, rogue shoes and people getting in your way so pretty much like a normal day but with cake.

They both moaned initially when they realised they had to play a game to get their cupcake but when the countdown started they couldn’t stop their little faces lighting up. You see there is nothing loved more by men than a challenge which involving man V food.

From this challenge I learnt that fun is still out there and although admitedly she just pops in every now and then I aim that one day she might stay a bit longer until the day she moves right back. When you have fun you might notice that the other people in your life seem happier too and when you share the fun you get to witness that sparkle appear back in their eyes that you forgot existed. I’m not quite at the end of my three week challenge but it makes me wonder what else can I do for 21 days?

Try it out yourself: give yourself permission to go and play ‘hide and seek’ cupcakes and find out that fun might just be waiting patiently for you to invite her back in.

Ingredients for Chocolate Fudge Rolo Cupcakes

130g room temperature butter
3 fl oz / 95 ml of boiling water
3 tsps strong coffee granules
75g Self raising flour
75g plain flour
30g cocoa powder
¼ tsp bicarbonate of soda
300g caster sugar
2 eggs (room temperature)
5 tbsp sunflower oil

70ml sour cream

Chocolate Fudge Rolo Cake Instructions

  1. I froze my rolos for 24 hours (but up to you if you wish)
  2. Preheat the oven
  3. Line a muffin tin with liners (my mix made 13 cakes so I left one to bake later)
  4. Mix coffee with boiling water and add to a pan with butter and chocolate
  5. Heat the mixture gently to melt
  6. Sift all dry ingreadients into your mixer bowl
  7. In a bowl combine and mix eggs, oil and courcream
  8. Add both the egg and chocolate mixture to the dry ingreadients
  9. Mix on low (2 for Kitchen aid) until combined
  10. Add approx 2 tbsp of mixture (I use a cookie scoop)
  11. Add one rolo in the centre of each and top with further tbsp. to cover the rolo
  12. Bake in the oven for 20-25 mins until the top springs back when touched or cake tester is clean
  13. Leave to cool in the tin

Caramel Buttercream Ingredients

125g caster sugar
4 tbsp of water
80ml double cream
½ tsp of salt (optional but does bring out the flavour)
1 tsp of vanilla essence
160g butter
200g icing sugar
2-3 tbsp of milk (if needed to make the buttercream lighter for piping)

Caramel Buttercream Instructions

  1. Heat the sugar and water in a pan until the sugar has disoloved
  2. Continue cooking until it turns a golden colour and thickens slightly
  3. Remove from heat and add cream be aware it may splutter so be careful
  4. Stir and leave to cool
  5. Cream butter and icing sugar for 5-6 mins (Kitchenaid gradually increase to speed 6 once combined)
  6. Add caramel and beat until combined (reserve some caramel to drizzle over your cupcakes)

To Assemble

Pipe or cover your cupcakes with lashing of caramel buttercream, drizzle melted chocolate and caramel over the top and adorn with a Rolo. Then go and hide them, trash the house and set the timer 🙂

Triple Chocolate Mousse Cake with Chocolate Covered Strawberries


Triple Chocolate Mousse Cake

Introducing Pay Day Cake 5 the triple chocolate mousse cake lovingly covered with chocolate covered strawberries.  This is probably not an eat in ‘best company’ cake as I find its destruction is accompanied by a loud drawn out satisfied sigh which you won’t realise you’ve made until you feel the heat of others eyes boring into you from all directions (they’re just jealous). Chocloate covered strawberriesIf you are kind enough to make this triple chocolate mousse cake for a special occasion you will find there are few people who can resist the sweet aroma of this celebration cake. Triple Chocolate Mousse Cake

A garden decorated with sparkly disco balls, candles and freshly made  pink lemonade jar cocktails greeted my Best Friend for her Birthday.  I am now known as the ‘Jar Lady’ which is a step up from the cat lady but only slightly. We had a great evening full of laughs, food and an impromptu random birthday dance that even the village people would have been proud of.

Triple CHoclate Mousse

As it turned dark I choose a song on my MP3 player but it randomly played its own choice of ‘It’s a beautiful day’ by U2 which I didn’t even know I had but it summed up the evening.  This was topped off with fairly lights that are not designed to twinkle but decided they would for ‘one night only’ in time with the beat for the entire song now how bizarre is that! I have no idea why these odd things keep happening but whoever is watching over me (maybe it’s the man in the photo that was taken of me on my recent holiday post) they obviously saw me having the time of my life and decided to add a bit of magic to an evening with friends that I will truly never forget.

You see the more you watch and pay attention to the World the more messages it gives you. Like it’s OK to have forgotten the candles when you find sparklers in the drawer you forgot you had but they were so much better.

Triple Chocolate Mousse

The laws of synchronicity are at work right now as somehow it decided you would stumble upon my little post which means you were destined to be here.  No matter how many years later you find this post share a little bit of mousse magic by passing it on to everyone you know and keep the Universe happy.

P.s the moment I pressed save my computer shut it self down of its own accord – this was to tell me to shut up I think – look Frugal Feeding I made it under 500 words whoo hoo albeit without the recipe 🙂

Day 1 – Bake the Cake layer (as in previous mousse cake post this is the second half of the layer)

Ingredients for Base Genesoise Cake Layer
75g plain flour
50g cocoa (good quality) or replace 50g flour for a plain base.
4 eggs at room temperature
125g caster sugar
30g melted butter (left to cool)

Instructions
1. Grease and lightly flour a 20cm round tin
2. Melt the butter in a pan and leave to cool
3. Beat the eggs and suga at a medium speed for 12 minutes until when you lift the whisk attachment out of the mixture falls in ribbons and pools on top of the mixture without disappearing straight away.
4. Sieve the flour and cocoa over the mixture
5. Fold in gently until combined
6. Drizzle in the butter and fold in – do not over fold or the cake will become tough – so when you think it is is nearly there and there are no huge lumps be brave and put it in the oven.
7. Bake in the oven on the middle shelf for 30 minutes
8. Leave to cool for 10 minutes before removing from tin and placing on a wire rack
9. Add 2 tablespoons of raspberry liqueur (Chrombards, Framboise) to 2 tablespoons of caster sugar – heat gently until the sugar is dissolved. Brush liberally over the cake to moisten it. If you prefer you can use a simple sugar syrup which is equal parts sugar to water and you can add a flavouring or substitute with another spirit.
10. Divide the cake into two layers using a long serrated knife.
11. Wrap the cakes in greaseproof paper once cool and wrap in foil. Either store in an airtight container until you need it or put it in the freezer.

Day 2 – Chocolate Mousse (based on Michael Roux – Desserts)

Ingredients
150g chocolate finely chopped
2 sheets leaf gelatin
50ml milk
1 1/2 tsp of liquid glucose
2 egg yolks
150ml whipping cream
30g icing sugar

Instructions

1. Set a bowl over a saucepan which is filled to one-third with water. To the bowl add the chopped white chocolate. Using a low heat wait until the chocolate is half melted and remove from the heat. The chocolate will melt by itself and this reduces the risk of it burning.
2. Soak the gelatin in cold water for 5 minutes. (optional)
3. Heat the milk in small saucepan until boiling point and then remove from the heat.
Squeeze out the water from the gelatin and add it to the milk. Stir gently until the gelatin has dissolved (optional)
4. In another bowl add the egg yolks, liquid glucose and 3 tbsp of warm water. Mix together until combined.
5. Whip the cream and icing sugar in another bowl until the cream leaves ribbon trails when you take the whisk out of the mixture.
6. Pour the hot milk over the white chocolate and gently mix with a whisk until there are no lumps and is it a smooth consistency.
7. Add the egg mixture to the chocolate and mix gently until combined.
8. Using a spatula fold in the cream gently until fully combined.

Assembly (phase 1)

1. Get your original tin that you baked your cake in – place the cake in the bottom (tip: use the bottom layer of the cake as the top layer will be smaller as cakes shrink as they cook). You can use the bottom layer for another cake.
2. Pour the mousse into the tin.
3. Place the tin in the freezer overnight for best results.

Day 3 – White Chocolate Mousse (based on Michael Roux – Desserts)

As above but replace the dark chocolate with white.
Take the cake from the freezer and pour white mousse mixture onto the cake and return to the freezer overnight or leave in the fridge overnight to set if serving the next day. The cake will last for at least one month in the freezer.

Day 4 – Strawberries & Eating!

1. Make Chocolate covered strawberries by melting 100g of chocolate in a bowl and dip the strawberries liberally into it.  Let the chocolate drip off the excess before placing on a sheet of greaseproof paper to set.  Melt some white chocolate (approx 50g) and drizzle over the top on the strawberries once set.  Either do this with the back of a spoon or  used a mini squeeze bottle.

2. To remove the mousse cake from the tin use a hair dryer or blowtorch to gently heat the tin so that it removes easily. Add the strawberries on top when you are ready to serve or the juices will escape and bleed into the cake.  Slice into portions with a warm knife (cleaning after each slice).

Enjoy!

White chocolate mousse cake with a raspberry blast secret centre


White Chocolate Raspberry Mousse Cake

Yes I made it to one whole year of blogging and here is the next pay day cake in celebration – number 4! (you can see the others on my recipe page) Well in reality 6 months half-hearted and 6 months full blogging and what a difference a year makes. This time last year I began by making cake truffles for my friends Birthday and look what I have made 1 year on. Here is the link to my very first post – be nice! I have tried to avoid baking a cake for my blog birthday but I gave in. It had to be something new to me and this is how the white chocolate mousse cake with a hidden raspberry blast was born. The candle on the top was the one I saved from my son’s first birthday cake (ahhhhh). This cake is perfect for the up and coming Jubilee celebrations.

The combination works so well together with the hidden layer of tart and icy raspberries, velvety smooth white chocolate mousse and dark chocolate sponge laced with black raspberry liquor.

Raspberyy Mousse Cake

You see despite its splendor this cake was not actually supposed to be like this I could lie to you but I won’t. The moment I had completed the white chocolate mousse layer I knew that it was not going to work as I had not used enough gelatine in it to allow the mousse to stand proudly on the plate as I had imagined. Not one to beaten I sat for hours pondering how I could rescue it and finally stumbled across a recipe for a frozen mousse cake. Yes! I cried to myself as I realised all I had to do was freeze the cake and serve it partially frozen. The result is a cross between mousse and ice-cream and it works beautifully and you get to keep and enjoy it longer.

White chocolate raspberry mousse cake

You see as I said in my earlier post synchronicity and the universe just work to create what is needed not necessarily what you though you wanted. The little girl in the picture above would have opted for the melting version as she loved ice-cream. That little girl is me and as you can see (see the 1st picture above ) my mouth is always open. When I slid this cake out of the tin I am pretty sure my mouth did the same excited gape.

White chocolate raspberry mousse cake

Compared to other things I have baked this is not too hard and the trick is to do it in stages gradually so it does not feel like a chore. The beauty being that you can make this over the jubilee weekend but is also perfect for any celebration where time before may be short. If you want to serve this as a mousse cake that does not freeze but stands proudly then I have added the optional gelatin requirements for each section. However I like it just as it is and I’ve learnt from it and you can see what else I created with mousse magic very soon!

Have Camper will travel

So I am off on the maiden voyage in May our 1979 Moonraker VW campervan for the half term week. Sadly the weather is not going to be as glorious as we have just had think 2 degrees overnight – brrrrr.

VW Campervan Moonraker 1979

Sneak Preview!

Day 1 – Bake the Cake layer

Ingredients for Base Genesoise Cake Layer
75g plain flour
50g cocoa (good quality)
4 eggs at room temperature
125g caster sugar
30g melted butter (left to cool)

Instructions
1. Grease and lightly flour a 20cm round tin
2. Melt the butter in a pan and leave to cool
3. Beat the eggs and sagur at a medium speed for 12 minutes until when you lift the whisk attachment out of the mixture falls in ribbons and pools on top of the mixture without disappearing straight away.
4. Sieve the flour and cocoa over the mixture
5. Fold in gently until combined
6. Drizzle in the butter and fold in – do not over fold or the cake will become tough – so when you think it is is nearly there and there are no huge lumps be brave and put it in the oven.
7. Bake in the oven on the middle shelf for 30 minutes
8. Leave to cool for 10 minutes before removing from tin and placing on a wire rack
9. Add 2 tablespoons of raspberry liqueur ( Chombards, Framboise) to 2 tablespoons of caster sugar – heat gently until the sugar is dissolved. Brush liberally over the cake to moisten it. If you prefer you can use a simple sugar syrup which is equal parts sugar to water and you can adda flavouring or substitute with another spirit.
10. Divide the cake into two layers using a long serrated knife.
11. Wrap the cakes in greaseproof paper once cool and wrap in foil. Either store in an airtight container until you need it or put it in the freezer.

Day 1 – Make the hidden raspberry layer

Ingredients for the Hidden Raspberry Layer
400g raspberries (I used frozen – defrost overnight before you need to use them)
2 sheets gelatin (if wanting it to stay in shape on defrosting)
60g golden vanilla caster sugar
1 tablespoon of raspberry liqueur (optional)

Instructions

1. Line a 6 inch or 18cm baking tin with cling film – making sure you have enough to hang over the sides of the tin fully.
2. Place the raspberries in a food processor and puree.
3. Push the mixture through a fine sieve to prevent the pips from getting in the puree.
4. Soak the gelatin leaves in two separate bowls of cold water (enough to fully immerse each) for five minutes.
5. Put the puree into a small pan and heat gently to 35C (not boiling but warm to touch) and then add the gelatin and stir to dissolve.
6. Add the sugar and stir until it is dissolved.
7. Remove from the heat. Leave to cool for about 20 minutes.
8. Pour the mixture into the lined tin and place in the freezer until the mixture has set (approx 1 hour) then cover over with extra clingfilm and leave overnight or until you want use it.

Day 2 – White Chocolate Mousse (based on Michael Roux – Desserts)

Ingredients
450g White chocolate finely chopped
6 sheets leaf gelatin
150ml milk
4 1/2 tsp of liquid glucose
6 egg yolks
450ml whipping cream
90g icing sugar

Instructions (if not using gelatin then remove these steps)

1. Set a bowl over a saucepan which is filled to one-third with water. To the bowl add the chopped white chocolate. Using a low heat wait until the chocolate is half melted and remove from the heat. The chocolate will melt by itself and this reduces the risk of it burning.
2. Soak the gelatin in cold water for 5 minutes. (optional)
3. Heat the milk in small saucepan until boiling point and then remove from the heat.
Squeeze out the water from the gelatin and add it to the milk. Stir gently until the gelatin has dissolved (optional)
4. In another bowl add the egg yolks, liquid glucose and 3 tbsp of warm water. Mix together until combined.
5. Whip the cream and icing sugar in another bowl until the cream leaves ribbon trails when you take the whisk out of the mixture.
6. Pour the hot milk over the white chocolate and gently mix with a whisk until there are no lumps and is it a smooth consistency.
7. Add the egg mixture to the chocolate and mix gently until combined.
8. Using a spatula fold in the cream gently until fully combined.

Day 2 – Assembly

1. Get your original tin that you baked your cake in – place the cake in the bottom (tip: use the bottom layer of the cake as the top layer will be smaller as cakes shrink as they cook). You can use the bottom layer for another cake.
2. Pour the mousse into the tin.
3. Remove the raspberry layer from the freezer and push down into the mouse mixture until it is about half way down. Place the tin in the freezer overnight for best results.

Day 3 – Eating!

1. To remove the mousse cake from the tin use a hair dryer or blowtorch to gently heat the tin so that it removes easily. You can then either slice into portions with a warm knife (cleaning after each slice) or place in a box for eating later and keep it in the freezer. The cake will keep frozen for at least one month.

Make Some Cake Bunting

To make youself some bunting to go on the top I used paint sample cards from Dulux and used a heart punch but you could also cut out bunting style triangles. I then stapled them onto ribbon and tied them to two lollie sticks. This is also far cheaper than ones you see on various websites. If making for the jubille then choose red, white, and blue colour cards.

Enjoy!

I’m entering this cake as I feel the flags say Jubilee celebrations to me and as you have an extra bank holiday you could make this cake over the weekend and enjoy it on the Monday or Tuesday. The competition is a Blogging Jubilee Baking Competition being run the fabulous Homemade By Fleur. If nothing else you should look at Fleur’s blog as I recently dreamt that we went shopping together (not that we have ever met but I have seen her on TV) and she gave me a signed copy of her new cookbook (not that she has one yet – this is dream after all) so as I said to her – it’s a sign! She is very talented and has had the pleasure of baking with Eric Lanlard in a baking competition that she rightly won . As you know I truly believe in signs so you must see Fleur’s rather stunning new website and check her out before she is famous. This competition has a prize that is sponsored by Appliances online. Wish me luck!

Up next: a drink recipe that will make you fall in love with summer.

Mojito Inspired Polenta Cake (Gluten and Dairy Free)


Mojito Gluten and Dairy Free Polenta Cake

IWhen I baked the lemon and berry polenta cake I promised I would be back to bake another one and here I am. Once again this was not a planned cake but one that just sort of happened. You would never guess this cake is both gluten and dairy free as like my last post of Raspberry Bakewell cake as it is light and moist.

Mojito poelnta cake

Juicy limes meet spiced rum in this gluten and dairy free cake and it’s all mine I tell you. Concoted with the last remenants of spiced rum so that my husband and I could not argue over who got the last tipple and some little limes I randomly ordered (as you do). I choose to miss out the mint in this cake as I’m not a big mint lover. I am sure someone somewhere will tell me that ‘technically it’s not a mojito cake then’. Fair enough, add a sprig of mint for decoration on the top and get over it I say as life is too short! This cake keeps beautifully and the depth of flavour increases over a few days as the rum truly soaks into the moist cake.

Mojito Polenta Cake
Life’s little coincidences

The voice of synchronicity is still going strong last weekend my Husband and my mobile phones both signalled a message at 08.30. Thinking that someone must have sent us both the same message I thought no more of it and went back to sleep. It turned out the messages were both from different people (who do not know each other) and one message was to sadly tell us of a death and the other a birth. A true reminder that life’s never-ending cycle is certainly evident. So I got up and baked this cake and pondered for a while.

Mojito polenta cake

Coincidence Number 2

Whilst still pondering I posted a picture of this cake using instagram. Later that day one of my followers on twitter spotted it and asked me kindly for the recipe for her next Clandestine Cake Club meeting. I thought she may live somewhere in the South so I asked where it was out of curiosity. It turned out that that we both live the same town. I mean what are the odds of that out of all the invisible people on twitter? She also kindly asked me if I would like to go and offered me a lift. So perhaps I am destined to actually go to a cake club after all?

Mojito polenta cake

Whatever conicidences happen ahead and I know they will I’d just like the universere to know that I’m ready, armed with cake and I have a 1950’s Kenwood stand mixer on stand by just waiting to soothe any trouble.

Mojito Polenta Cake

Recipe (adapted from Doves Farm)

120g sunflower oil
150g caster sugar
3 eggs (room temperature)
75g ground almonds
1/s tsp gluten-free baking powder
2 limes – grated rind and juice
75g Polenta (quick cook fine grain variety)
50g granulated sugar ( for the sugar syrup) and a tad more for sprinkling
40ml of spiced rum (20 ml for the cake and 20ml for the sugar syrup)

Instructions

1. Preheat oven to 170°C/Fan150°/325°F/Gas 3
2. Grease a 18cm/7”cake tin and line with baking parchment or greaseproof.
3. Beat oil, eggs and sugar together for 3 mins
4. Mix in the ground almonds and baking powder until fully combined.
5. Stir in all grated lime rind and juice of one lime – reserve the rest for the sugar syrup.
6. Add 20ml of spiced rum
7. Stir in the polenta.
8. Spoon mixture into cake tin.
9. Bake for approx 40/45 minutes on the middle shelf
10. Allow to cool in the tin.
11. Add the juice of the remaining lime into a saucepan with 50g sugar and 20ml of spiced rum.
12. Boil gently, stirring regularly, for 5 minutes to form a thick syrup.
13. Make holes in the cake with the cake tester or a skewer and pour syrup over the cake
14. Allow to cool before removing from the tin. Sprinkle the top of the cake with sugar and finish with a sprig of mint if you wish!

Storage

This cake is very moist and will last in an airtight container for up to 5 days. You might also like my Lemon and berry polenta cake. or wish to read more about gluten free baking.

Props: Rainbow bunting (Folksy £20), Cake stand – Wilkinsons £8 and heart band made with paint cards (free from DIY stores) punched with a heart shaped punch and stapled onto ribbon.

Enjoy!

Raspberry Bakewell Loaf Cake (Gluten and Dairy Free)


Raspberry Bakewell Cake

Finally I made myself a cake that is dairy free and gluten free who knows next time it will be cake without actually having cake in it? I have a guilty secret to share I am having a bit of a love affair with raspberries at the moment and I can’t wait until raspberries come into season but for now frozen will do.

Raspberries suit this moist cake beautifully and make me think of summer (sigh) oh how I miss it. It’s not right to still be wearing jumpers in May and with a looming maiden camping voyage in the ‘so nearly finished after two god damn years’ VW camper and when I look out the window at the rain and realise with dispair that it’s certainly not looking promising. At least the cake to take looks like a slice of summer.

Raspberry Bakewell Cake

When we brought the van to experience retro style family holidays I did not quite have in mind rain, men and smelly feet. I’ll admit being a fair weather camper and whilst some people stuck in a middle of a field somewhere may pine for the lack of television, toilets, proper showers or the internet but no not me I will pine for the loss of my oven. Although I did spot a mini electric one for £39 in Lakeleand that plugs in and sadly I am very tempted.

Coming on the trip is Ron and Ronald the comedy bromance duo (husband and his best friend) as well as my about to be teenage son leaving me as the only one with two ovaries in the camper and with the fact that I’m sat here having hot flushes they may be on their way out too. So many unimportant but nagging questions are running through my head like the torrential downpour drumming on the window as I speak ranging from:

1. Sod the food how much wine can I actually fit in the van for medicinal purposes?
2. Does Lakeland have a testosterone repellant I can spray around the van and on myself or do I have to have PMS / Pre-menopause hormones for a whole week to get any peace?
3.Will bunting actually make me feel more girly in a camping world that will involve stories of clutch repairs long winded attempts at humourous breakdown stories stuck on repeat.
4. If I put up sparkly lights, light scented candles, get out my sparkly rug will this constitute glamping or do need fluffy heeled slippers for that?
5. Will my husband actually read this post and then I will be in the proverbial dog house all week anyway?

Raspberry Bakewell Cake

This rainy cold spell is not doing my ass any favours either. It feels as if it is getting larger with each passing rainstorn. Comfort food is still the order of the day in fact I still want to cook soup for goodness sake! This cake was supposed to be frozen for the trip but instead it spoke lovingly to me. Quite literally my ass and brain simultaneously decided extra pounds were needed to be added to my curves in preparation for warmth needed on those cold camping nights. Oh well I can bake another one but just imagine if I had the mini oven I could just pop out a cheeky one there. Nope there is no hope for me.

Raspberry Bakewell Cake

Recipe adapted from BBC Good Food – I choose to do a loaf cake (2 pound) as I have just discovered the joy of paper liners for cake tins and they are the only size I have (yet). It was a choice of faffing around with lining a tin or just plonking a liner in. Yes you know which one won, however this cake will also fit a 20cm deep cake tin just fine.

See also my 7 top tips for gluten free baking

Ingredients
175g ground almonds
175g softened butter (or use dairy free substitute or use flavourless oil such as sunflower)
175g golden caster sugar
175g self raising flour (Gluten Free – Substitute with gluten free self raising flour – like Doves. Also add 1 tsp of xanthum gum to prevent cake from being too crumbly)
2 large eggs (rooom temperature)
1 tsp vanilla extract
200g raspberries

Instructions
1. Preheat oven to 180c / 160 fan / gas 4
2. Line a 2lb loaf tin
3. place all the ingredients in a food processor and mix until well combined
4. Put half the mixture into the lined tin and level it
5. Sprinkle over the raspberries and cover with the remaining half of the mixture and level with a spoon or spatula.
6. Place on the middle shelf of the oven and bake for 50 – 60 minutes, ovens do vary. You should check your cake at 45 mins to make sure it is not getting to brown on top – if it is you can cover it loosely with foil to prevent burning).
7. Test cake by inserting a skewer, if it is ready it should come out clean. Remove cake from the oven and leave to cool in the tin.

Almond Icing (optional)
140g icing sugar
1tsp almond extract or 1 tablespoon of amaretto if you are feeling naughty
2-3 tbsp of water

Instructions
1.Mix the extract and 2 tbsp of water into the mixture until combined. Keep adding water gradually until the icing is thick but not too runny. Drizzle over the top of the cake.
2. Toast the almonds in a pan with no oil on a low heat. After about 3 minutes the oil will begin to be released from the almonds and they will begin to brown. Keep moving the pan around to stop them from burning. When they reach a golden brown colour remove from the heat and leave to cool before sprinkling over the top of your cake.

Serve and enjoy x

Raspberry Bakewell

Sticky Toffee Pudding Layer Cake (Gluten Free)


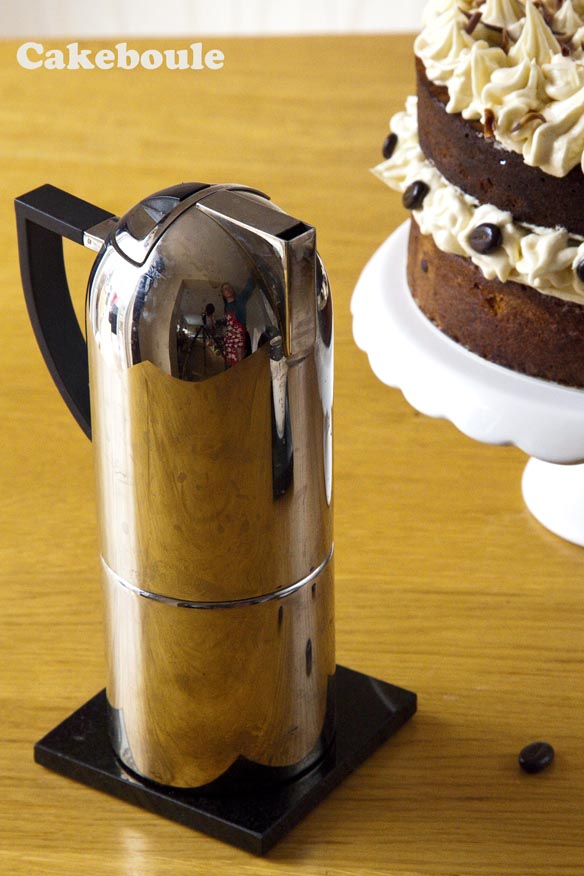
This is my second pay day cake as the first was the ‘Macchiatto’ espresso, vanilla and caramel layer cake and this month I wanted to create a sticky toffee pudding cake that was moist, not covered in sickly buttercream but smooth and silky in the mouth.  It was not easy to photogrpah this cake and it may look a lttle dark but I assure you it is not burnt just crammed full of dark rich dates.Sticky Toffee Pudding Cake by Cakeboule

My pay day cake idea revolves around creating a reward to celebrate the fact that I’ve been paid and made it to the end of another month as we should all be thankful if we have jobs these days. However I believe there is always an excuse that can be made for making or eating cake so that it does not need to be kept solely for Birthday celebrations, here are a few examples:

1. I love you cake (aka its all for me)
2. It’s Friday, Monday cake etc whatever day you want to celebrate
3. ‘I saved a fortune by getting all this in the sale’ cake (honest)
4. I put up with your snoring so I deserve cake
5. There is a celebration most days on google with a funky graphic so if you are really desperate use that as your excuse!

Sticky Toffee Pudding Cake by Cakeboule

You don’t have to go the full monty and make a four tiered layer cake as I do this to me as each layer represents a week worked. If you wanted to you could half the recipe and bake it a 20cm tin, cut in half and smother the middle it in sticky toffee sauce. Or you could heat it up, drizzle with more sauce and serve with ice cream for a delicious pudding. The bonus of a cake version is that is portable so you can have a sticky toffee hit where ever you go.

Sticky Toffee Pudding Cake by Cakeboule

This produces a dense moist cake but it is not overly sweet like you might expect as it uses a swiss meringue buttercream flavoured with the sticky toffee sauce. Unlike a normal buttercream (butter and icing sugar) swiss meringue buttercream is not as sweet so will need flavouring. The buttercream is a bit fiddly but not as bad to make as I thought it would be and the reward is a very smooth silky buttercream that knocks the socks off any other I have tried.

Sticky Toffee Cake

To Make this Gluten Free
I have made this gluten free a few times before with great success.  Simply substitute the self raising flour (see below) with gluten free self raising flour (I use Doves Farm). As this is a very moist cake it works well as a gluten free cake and needs no further moisture or xanthum gum. For more gluten free info – ready my 7 tips for gluten free baking here.

Ingredients (cake)
450g dates, pitted and chopped (soaked in 300ml water with 4 green tea bags or use ordinary tea bags)
2 tsp vanilla extract ( use my own version so I know it has no nasty stuff in it)
2 tsp mixed spice
360g self-raising flour
2 tsp bicarbonate of soda
230g unsalted butter, softened
350g light muscovado sugar
4 eggs, lightly beaten

Instructions for the Cake
1. Preheat oven to 180°C/fan oven 160°C/350°F/Gas mark 4.
2. Line 2 x 20cm round loose bottomed tin with greaseproof paper.
3. Using scissors cut up the dates into small pieces.
4. Put the dates and water into a large saucepan.
5. Bring dates and water to the boil and continue to cook uncovered for 8 minutes until dates have softened
6. Remove from heat, fish out the teabags – remember count them in and out as you don’t want to forget one – it’s just like being on a school trip.
7. Stir in the bicarbonate of soda – this may make the mixture froth so be careful.
8. Leave the date mixture cool on the side – although if you are impatient (like me) the cake will still work but it will melt the butter so it won’t be as fluffy and cake like.
9. Cream together the butter and sugar until smooth, pale and airy.
10.Beat in the eggs and add to the butter and sugar mixture. Add vanilla extract.
11. To the mixture in the flour and the e mixture (cooled).
12. Pour (as this is quite a liquid mixture) into the prepared baking tins and level the surface.
13. Cover the cake with foil
14. Bake for approximately approx 30 mins and then remove the foil ( to prevent burning) and bake for approx 10 minutes more. It is ready when the top is golden and the cake has begun to shrink away for the sides. It will still have a little bit of a wobble as the mixture is moist.
15. Leave to cool in the tin and transfer to a wire rack.
16. I always leave cakes that are being layered overnight in an airtight container wrapped in greaseproof paper so that they do not crumble when you cut them.

Ingredients for Sticky Toffee Sauce
120g light brown sugar
120g salted butter (but unsalted works just as well)
100ml cream (I used Elmlea half fat)

Instructions for the Sauce
1. Melt the butter and sugar in a saucepan over a low heat until the sugar has dissolved whilst stirring so the sugar does not burn. To check the sugar has dissoleved you can put a very small amount on your fingers and rub them together it should not feel gritty but be careful as it will be hot.
2. Stir in the cream and heat until gently bubbling – stir continually. Remove from heat and leave to cool.

Tip – You can always double the recipe and put it into an airtight jar and store in the fridge for toffee fudge sundaes in the next week – yum!

Swiss Meringue Buttercream (Adapted from Sweetapolita)
If you have never done swiss meringues before I urge you to read Sweetapolita’s article – swiss meringue buttercream demystified – it is a god send and made me feel far more confident that was until it curdled – but I have included how I fixed this later on in this article!

Ingredients
120g egg whites (I used liquid egg whites which you can buy in a carton from the Supermarket as they are pasturised)
200g granulated sugar
340g butter (soft but still cool)
1 tsp vanilla extract
1 Vanilla bean (seeds only)

Special equipment
Double boiler, baine marie / porriger pan or use a bowl over a saucepan – make sure this clean by wiping it with a lemon or vinegar
Sugar or jam thermometer

1. Beat your butter using a hand whisk and transfer to a seprate bowl for later.
2. Add about 1/2 inch of water in the bottom of the pan / bowl and add the egg whites and sugar to the pan / bowl
3. Whisk gently over a low heat until the egg whites reach 140C and then remove from the heat
4. Pour egg whites into mixer bowl and whisk on medium speed for five minutes. Continue on high until stiff peaks form. Keep whisking until the bottom of the bowl is no longer warm – this is really important as you do not want to melt the butter when you add it (this takes about 8 – 10 mins)
5. Add the butter one tablespoon at a time whilst still mixing and watch it until it has combined – continue in this way until all the butter has been added. If you mixture is soupy you did not wait long enough for the egg whites to cool – put the mixture back it the fridge and then try again in 15-20 mins. Is it curdled and yukkly? See below…
6. The mixture will come together to become light and fluffy – add the sticky toffee topping to your own taste – add a tablespoon of sauce (one at a time) whilst still mixing. Any left over sauce can be used over ice-creams for sundaes!

Dillema – The Swiss Meringue Buttercream Curdle (How to recuse it)
Yes I hit this problem and I kept mixing the buttercream like Sweetapolita tells you to do and have faith that all will be fine. After five minutes faith was leaving me, I tried putting it in the fridge, praying, beating it on high, low but none if it changed the fact that the SMB looked disgusting!

However I did find something that works on this site – take 1/4 of the mixture out and pour into a microwavable bowl – heat for 15 seconds and then stir it to get a smooth consistency before pouring it back into your mixture. Whisk again on a low-speed. This worked and I was so pleased to have saved the buttercream.

Toffee Swiss Meringue Buttercream

To Assemble the Cake

Cut each cake into two even layers (I use a tape measure to make sure each layer is evenly sized. I don’t have a cake stand that rotates but I do use a revolving cheese board stand but you could also uses a lazy susan to do the job. Add a dollop of buttercream to the centre of your stand and add your first layer of cake and press down – this will keep your cake in place while you work.

Assembly

1. Put half the SM buttercream into a large piping / pastry bag and use a large star open tip nozzle
2. Use a palette knife to spread out the sticky toffee sauce onto your first layer. Make sure you don’t go right to the edge or the sticky toffee sauce is likely to ooze down the sides of your cake.
3. Spread SM buttercream across the top of the sticky toffee sauce – again keep in from the edge
4. Pipe around the edge of your layer using and up and down (think waves at the sea) motion until you have gone round the entire cake
5. Add the next layer carefully so as not to squash the piping
6. Repeat until all layers are done
7. Cut up fudge pieces and add to the top if you wish

Sticy Toffee Pudding Cake

Important Storage Notes
This cake should be stored at room temperature which is fine if you used the pasturised egg whites. After a couple of days it will need to go back in the fridge if there is any left. However if you are putting in the fridge you will need to get the cake out and let it come back fully to room temperature or the icing will taste disgusting!

Quick Malt Chocolate Cake or Cupcakes


Malt chocolate cake was what I was craving as I wanted a delicate, light chocolate cake smothered with malteaser buttercream icing.  So I set off to the kitchen to indulge my chocolate fix dragging my Son with me promising him he could lick the bowl. Now as this recipe is quite quick it will be no time before you can also sit down with one in hand and enjoy the story at the end of this post about ‘How to upset a cupcake’.  It’s nearly easter and these are perfect to decorate with eggs if you wish.

Malt Chocolate Cake

This malt chocolate cake is light and fluffy and is an adapted version from Peggy Porshen’s book Cake Chic (buy it here).

Malt chocolate cake

I choose to make 12 large cupcakes but this would also make a fantastic quick bake in a 20cm (round or square) tin with malt chocolate buttercream icing spread over the top. Decorate it with chocolates or malteasers and you are ready for a children’s party, cake sale or for when time is short but you still want a light fluffy chocolate fix.

I made a chocolate buttercream and added malt powder to compliment the cake flavour.  Crushed malteasers (whoppers) were mixed into the buttercream and more sprinkled on top for decoration.  This works well if you are eating the cake on the same day as it gives you a satisying crunch to the topping.  If the cakes make it past 24 hours (give yourself a pat on the back) you will find the crunch melts beautifully into the buttercream leaving gooey pools.  Due to the bits of malteaser in this buttercream it will not pipe unless you use a large round plain pastry nozzle so instead just put it on with a palette knife and smooth it round and enjoy less washing up.  Now is the time to either scroll for the instructions or read the tale below…

Malteaser cupcake

 Storytime – How to upset a cupcake (a tale of dating, technology and oops)

One evening whilst immersed in my marking I’m interrupted by the laughter and animated chatter of my Husband and his friend gossiping in the kitchen.  Let’s call these two Ron (Friend) and Ronald (Husband) for ease as when together are truly like two old women who have not seen each other for a lifetime instead of at the weekend.  They have little comedy duo spats and arguments over how to fix the (more manly) camper van but mostly they banter with each other each trying to out do the others in wittiest stakes.

Tonight’s conversation will be about Cupcakes

Tonight’s topic of conversation got my attention as I heard the word ‘Cupcakes’ rather than clutch repair so I began to listen whilst tapping furiously on my keyboard to make it look like I was not listening (naturally).  After a few minutes I realise Cupcake is a pseudonym used by a lady Ron met recently on a dating site and not the edible cake kind I love.  They discuss in great detail the second date, descriptions of flirty text messages are analysed by the two boys men and the kiss was relived in second by second sloshing detail before googling the next possible date location.  The conversation finally veered off to their good old days when Ron apparently used to be a bit of a man whore (their words not mine).  Now I was bored by the notch on the bedpost nostalgia and returned to my marking.

I looked up when Ron’s loan phone (the other had died) beeps, he pulls it out from his pocket whilst  laughing at the last smutty comment.  Ronald chuckles like a crazed hyena but Ron has gone strangely quiet.  I see Ron’s face drain of colour, sweat beads spring across his forehead quicker than a chicken pox rash and his cheeks glow in a reminiscent shade of a telephone box.  Ron looks up from his phone and with a loud and drawn out ‘ooohhh’ and we wait for the next words:
‘What is it?’ asks Ronald impatiently.
‘It’s a text from Cupcakes’
‘OK, so what does it say?  No hang on don’t tell me she is organising the wedding cars already!’
‘Umm, no.  Not exactly’ replies Ron shaking his head.  ‘I don’t quite know what has happened.  Let me read you the text. He takes a big breath ‘I have just listened to a four minute voicemail message from you talking to your friend and I am not impressed’.

The two of them look at each other and their little brains are working overtime to work out what could have happened.  Sadly the loan phone that Ron had did not have a keyguard lock and it accidentally rang the lady from his pocket.  She replayed the voicemail conversation and listened to every single word that was said on more than one occasion.  Poor Ron  never made a next date so I gave him an extra cupcake to make up for it.  The moral of the story is to never share your secrets with a friend unless your are absolutely sure your phone has keyguard lock on.  Oops!

Malt Chocolate Cake Ingredients (makes 12 large cupcakes, 1 x 20cm cake)

150g dark chocolate
200ml milk
450g brown sugar (I use light muscavado)
150g salted butter softened
4 eggs lightly beaten
300g plain flour
3 tbsp cocoa powder ( I use Green and Blacks)
1 tsp baking powder
1 tsp bicarbonate of soda
3 tbsp malt powder (like ovaltine or any other malt flavoured powder drink)

Instructions:

1. Preheat oven to 160 C / 150 / Gas ?? / F
2. Line your muffin tin with muffin cases (I like large cupcakes)
3. Beat the butter and sugar until ight and fluffy (about 5 minutes)
4. Put chocolate , milk and half the sugar in a saucepan and stir until all contents are melted and then leave to one side until cooled.
5. Sift the dry ingredients – flour, cocoa powder and baking powder and bicarbonate of soda onto a tray (this gives it air)
6. Slowly add the eggs one at a time then adding a quarter of the dry mix (above) repeat until all eggs and mixture are fully combined
7. Start to add the hot mixture slowly into the batter by pouring down the side of the bowl
8. Once combined – pour into cases tin and place in the oven until cooked (approx 15 mins)
9. Leave to cool in the tin for 10 – 15 mins and then remove and place on a wire rack

Malt Chocolate Buttercream

175g soft butter (but not too soft it is squdgy)
350g icing sugar
1 tbsp cocoa powder ( I used Green and Blacks)
1 tbsp malt drink powder (like Ovaltine)
4-5 tbsp of milk
100g crushed malteasers

Instructions

1. Mix together the butter and icng sugar using light and fluffy (about 5 minutes) in a stand mixer or using a hand whisk
2. Add the milk until the consistency is spreadable
3. Add the cocoa and malt powder and mix until fully combined
4. Add crushed malteasers (leaving some to sprinkle on top) to the mixture and give a final mix until it is fully combined
5. Spread onto your cupcakes and then use a palette knife to smooth around the edges
6. Top with a malteaser and sprinkle over the remaining crushed malteasers and then eat!

Ginger and White Chocolate Buttercream Cupcakes


Cupcake Ho!
After last weeks very sentimental post (sniff) it is time to give you more cake!  What better way to say I love you than to combine stormy sea views with warming stem ginger cupcakes lavished with smooth dreamy white chocolate buttercream. Ginger White Chocolate Cupcakes 

We ventured to Westward Ho! for a secret break I organised for our anniversary to a seaside town in North Devon, UK.  You can see more of my photography on my Flickr gallery. He did not have a clue where we were going but chouxchouxbedoo guessed it!

Westward Ho! is one of the 2 locations in the World which offically has an exclamation mark as part of its name.  I am known to overindulge in my exclamation mark use so it seemed fitting to go somewhere where it’s an acceptable part of conversation. Ginger White Chocolate Cupcakes

I love this place and in my dream I will live by the sea, waking up to uninterrupted views of the ocean every morning.  Of course on the bedside table there is a steaming mug of coffee and a freshly baked cupcake to compliment the dreaminess of the view and as this is a dream it will have no calories.

Ginger White Chocolate Cupcakes

Sprinkles and cupcakes are an iconic duo like Fred Astaire and Ginger Rogers they are destined to dance together so heart-shaped chocolate sprinkles had to be included. I created mini handmade chocolate fondant roses (my first ever attempt) and made larger white chocolate roses.

Ginger White Chocolate Cupcakes

Maisie Fantasie Cupcakes Ebook

This dream was originally inspired by Maisie Fantasie a London wedding cake designer. Her ebook on cupcakes is truly heavenly and if you only get one cupcake book ever then this truly is the one and at a £4.99 it represents a real bargain. There are 20 cupcake recipes and each one has beautiful imagery and simple recipes which are easy to follow and recreate at home.

Often I find cake books do not seem to translate well to conventional ovens and the results are then disappointing but so far each recipe has been great (no I did not get sent a copy I paid for it!). Whilst I love her ginger cupcakes my Husband wanted more ginger kick so I worked to adapt the recipe which is below.

I even made a mini ruffle layer cake made out of two cupcakes stacked on top of each other – see that’s love for you packing the piping kit when going away! Ginger white chocolate cupcakes

Decorating ideas
Top with fresh strawberries or chocolate roses made from chocolate fondant icing or use sprinkles – anything goes really!

Ruffle Mini Cake
I used two cupcakes minus their wrappers – one placed upside down on top of the first which is right side up.  I then used a pallete knife to spread buttercream around their join. The buttercream was piped in zig zag  ruffles up the side using a small petal tip (click to see a video where I got the idea from – I love this video as the little boy makes me chuckle as kids love to get involved at the most awkward of times). This was not as daunting as I first thought.  Just keep on piping and you will be amazed how simple it is! The cake was topped with a choclate from Hotel Chocolat a strawberry and black pepper (Read all about this divine chocolate here). The result was simple yet elegant and as my husband noted two cupcakes together are more man-sized!  Another review on Hotel Chocolat will be coming this way shortly.

I Heart Rocky (Story Time – if you don’t do stories hurry on down for the instructions)

As any respecting parent should do on holiday I forced my Son to partake in two walks with me per day which he throughly enjoyed after protesting and sulking for at least twenty minutes each time.  In the mornings we would venture off towards Cornborough Beach for a spot of rock and pebble hunting.  On the last day we finally found a rock with a funny face for my best friend and a heart shaped one for my Husband after a week long search.  

Instantly I went into ‘be prepared’ Girl Guide mode and pulled out a carrier bag to put the prized treasures in, well you never know when you might need a carrier bag even on a cliff top walk.

Westward Ho!

As we had been succesful we called it a day and jubilantly bounced back up the steep and rugged hill, battling the wind as we went. My happiness was fuelled with excitement of finding shaped rocks as it is always the little things that do it for me.  My Son’s happiness was because he no longer had to search for stupid shaped rocks and could go back and play on the Wii in peace.

Rock Friend Cakeboule

Towards the top of the hill my Son searched out my other hand to hold and I took a sharp intake of breath and smiled.  As he is nearly a teenager this struck my heart strings and reminded me of years gone by that I miss. Sighing with happiness I swung the bag in time with my steps until on the backward swing the bag split and rocks tumbled in all directions back down the hill. We laughed as we ran after them clomping down the hill noisly in our wellies and we managed to rescue the heart and Rocky.  I was so determined to take them home that mere lack of bag did not deter me and I carried them both like a small rock child the whole two miles home taking comfort in the fact that at least this one did not complain. Coffee and cupcakes greeted us at the apartment which was a good job as my arms were locked in rock holding position but luckily I found this worked in my favour for plate to mouth movement..

Finally – here are the instructions!

Ginger cupcake recipe ( my own adaption )

200g self raising flour / cake flour
200g softened butter
200g dark muscavado sugar (or dark brown sugar)
4 medium eggs at room temperature
5 tsp ground ginger
1 tsp cinnamon
1 tbsp golden syrup
1 tbsp black treacle
1 tsp homemade vanilla extract (or shop brought)
5 pieces of stem ginger (approx 50g)

1. Preheat the oven to 170 / Gas 4 / 150 fan and line a muffin tin with large cupcake / muffin cases
2. Cream butter and sugar together until light and fluffy (approx 5 mins it will begin to pale in colour)
3. Add two eggs to the creamed butter and sugar and mix to combine fully
4. Add half the flour and mix until it is incorporated
5. Repeat with the remaining eggs and flour
6. Add the ginger, black treacle and golden syrup and mix to combine fully
7. Divide the mixture between the muffin cases ( I always use a cookie scoop to get the right amount)
8. Wash the stem ginger under the tap and cut into small pieces
9. Sprinkle the pieces of stem ginger onto the top of the cupcakes evenly

Bake for 20 – 25 minutes until golden, springy to the touch and a skewer or cake tester is clean when removed

White Chocolate Buttercream

100g butter
200g icing sugar
100g white chocolate ( I used Belgian)
100ml double cream

Instructions
1. Pour cream into the pan and bring slowly to a boil
2. Immediately pour cream over the white chocolate and stir gently until the chocolate has melted
3. Leave the chocolate mixture (ganache) to cool
4. Beat together the butter and icing sugar until fluffy. Once the chocolate has cooled to about body temperature add to the butter mixture and beat together until smooth.
5. Add the mixture to the top of the cupcakes either using a palette knife or a piping bag and get creative!

Westward Ho! you have my heart and I will be back x