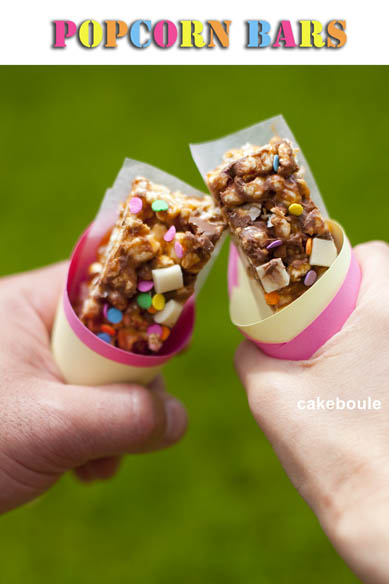
Gooey Popcorn Bars (Gluten Free)


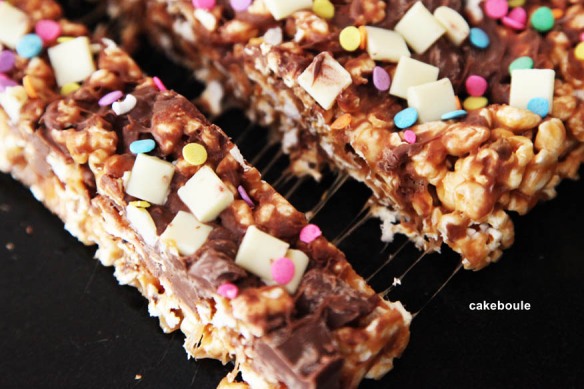
Say sod it and call a movie night with a gooey, toffee, marshmallow and chocolate covered popcorn bar in hand.  Seek pleasure watching the silky caramel strands form as you pull the bars apart. This is a quick tray bake but with no baking (bonus!) but guaranteed to brighten up the dull and miserable summer we are having and great for big kids parties.

Popcorn Bars

I have never made popcorn before and I was more than a little bit excited when I saw fluffy white clouds pinging around my saucepan. Truthfully I was that excited I had to call the entire family to watch a miracle in the pan. If you have never made popcorn before then you truly have not lived.

Popcorn Bars

This recipe is an adaptation of my toffee crispie treats. After spending days discussing films set in New York with a friend I am now eager to sit down with one of these next week watching chick flicks to my hearts content so go on let it rain see if I care.

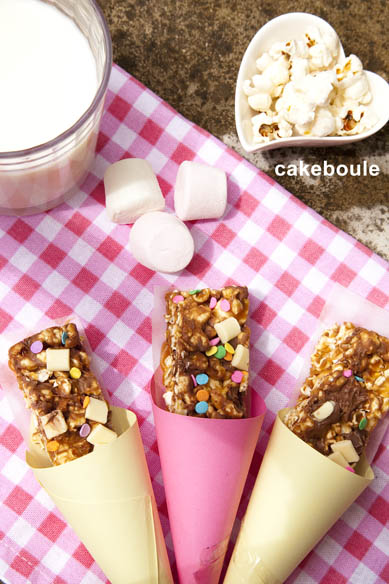
Popcorn bars

Of course you can top them with anything you like as this is an easily adapted recipe. I like the idea of twix or malteaser topppings or give it blast with some popping candy a la Heston style.

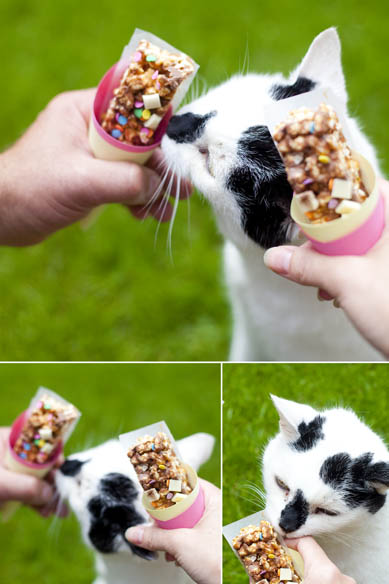
Popcorn BarsThe cat loved them too as he sauntered into the photograph, sniffed and then bit my finger!

Popcorn Bars

Enjoy!

Ingredients

250g toffees (Sainsbury’s Basics)
50g butter (room temperature)
3 tbsp of milk
1 tbsp of golden syrup
115g marshmallows
80g popped popcorn

Instructions

1. Brush your a 20cm square tin (or other suitable) with baking spray or oil and wipe with a kitchen towel to make sure it is not too oily.
2. Add toffee, golden syrup, butter and milk into a saucepan and heat gently.  Stir the mixture as it heats until all the ingredients have melted.
3. Add marshmallows and stir until they have melted.
4. Add the popcorn to the pan and make sure it is well coated with the toffee mixture
5. Pour quickly into prepared tin and flatten it down well with the back of a wet wooden spoon.  Add whatever toppings you fancy by pushing them down gently into the mixture so they set into to it.
6. Leave to set (about an hour) and cut into sizes required and eat (one is not enough) they will keep for about 5 days if they get that long in an air tight container. Do not place in the fridge or the pocorn will go soft.

Up next – Pay Day Cake 6 time!!!! (see previous here)

I am entering this into the Teatime treat competition hosted by the talented Karen from Lavender and Lovage and the theme this month is cake stall cakes and I think this will fit quite nicely.

Sticky Toffee Pudding Layer Cake (Gluten Free)


This is my second pay day cake as the first was the ‘Macchiatto’ espresso, vanilla and caramel layer cake and this month I wanted to create a sticky toffee pudding cake that was moist, not covered in sickly buttercream but smooth and silky in the mouth.  It was not easy to photogrpah this cake and it may look a lttle dark but I assure you it is not burnt just crammed full of dark rich dates.Sticky Toffee Pudding Cake by Cakeboule

My pay day cake idea revolves around creating a reward to celebrate the fact that I’ve been paid and made it to the end of another month as we should all be thankful if we have jobs these days. However I believe there is always an excuse that can be made for making or eating cake so that it does not need to be kept solely for Birthday celebrations, here are a few examples:

1. I love you cake (aka its all for me)
2. It’s Friday, Monday cake etc whatever day you want to celebrate
3. ‘I saved a fortune by getting all this in the sale’ cake (honest)
4. I put up with your snoring so I deserve cake
5. There is a celebration most days on google with a funky graphic so if you are really desperate use that as your excuse!

Sticky Toffee Pudding Cake by Cakeboule

You don’t have to go the full monty and make a four tiered layer cake as I do this to me as each layer represents a week worked. If you wanted to you could half the recipe and bake it a 20cm tin, cut in half and smother the middle it in sticky toffee sauce. Or you could heat it up, drizzle with more sauce and serve with ice cream for a delicious pudding. The bonus of a cake version is that is portable so you can have a sticky toffee hit where ever you go.

Sticky Toffee Pudding Cake by Cakeboule

This produces a dense moist cake but it is not overly sweet like you might expect as it uses a swiss meringue buttercream flavoured with the sticky toffee sauce. Unlike a normal buttercream (butter and icing sugar) swiss meringue buttercream is not as sweet so will need flavouring. The buttercream is a bit fiddly but not as bad to make as I thought it would be and the reward is a very smooth silky buttercream that knocks the socks off any other I have tried.

Sticky Toffee Cake

To Make this Gluten Free
I have made this gluten free a few times before with great success.  Simply substitute the self raising flour (see below) with gluten free self raising flour (I use Doves Farm). As this is a very moist cake it works well as a gluten free cake and needs no further moisture or xanthum gum. For more gluten free info – ready my 7 tips for gluten free baking here.

Ingredients (cake)
450g dates, pitted and chopped (soaked in 300ml water with 4 green tea bags or use ordinary tea bags)
2 tsp vanilla extract ( use my own version so I know it has no nasty stuff in it)
2 tsp mixed spice
360g self-raising flour
2 tsp bicarbonate of soda
230g unsalted butter, softened
350g light muscovado sugar
4 eggs, lightly beaten

Instructions for the Cake
1. Preheat oven to 180°C/fan oven 160°C/350°F/Gas mark 4.
2. Line 2 x 20cm round loose bottomed tin with greaseproof paper.
3. Using scissors cut up the dates into small pieces.
4. Put the dates and water into a large saucepan.
5. Bring dates and water to the boil and continue to cook uncovered for 8 minutes until dates have softened
6. Remove from heat, fish out the teabags – remember count them in and out as you don’t want to forget one – it’s just like being on a school trip.
7. Stir in the bicarbonate of soda – this may make the mixture froth so be careful.
8. Leave the date mixture cool on the side – although if you are impatient (like me) the cake will still work but it will melt the butter so it won’t be as fluffy and cake like.
9. Cream together the butter and sugar until smooth, pale and airy.
10.Beat in the eggs and add to the butter and sugar mixture. Add vanilla extract.
11. To the mixture in the flour and the e mixture (cooled).
12. Pour (as this is quite a liquid mixture) into the prepared baking tins and level the surface.
13. Cover the cake with foil
14. Bake for approximately approx 30 mins and then remove the foil ( to prevent burning) and bake for approx 10 minutes more. It is ready when the top is golden and the cake has begun to shrink away for the sides. It will still have a little bit of a wobble as the mixture is moist.
15. Leave to cool in the tin and transfer to a wire rack.
16. I always leave cakes that are being layered overnight in an airtight container wrapped in greaseproof paper so that they do not crumble when you cut them.

Ingredients for Sticky Toffee Sauce
120g light brown sugar
120g salted butter (but unsalted works just as well)
100ml cream (I used Elmlea half fat)

Instructions for the Sauce
1. Melt the butter and sugar in a saucepan over a low heat until the sugar has dissolved whilst stirring so the sugar does not burn. To check the sugar has dissoleved you can put a very small amount on your fingers and rub them together it should not feel gritty but be careful as it will be hot.
2. Stir in the cream and heat until gently bubbling – stir continually. Remove from heat and leave to cool.

Tip – You can always double the recipe and put it into an airtight jar and store in the fridge for toffee fudge sundaes in the next week – yum!

Swiss Meringue Buttercream (Adapted from Sweetapolita)
If you have never done swiss meringues before I urge you to read Sweetapolita’s article – swiss meringue buttercream demystified – it is a god send and made me feel far more confident that was until it curdled – but I have included how I fixed this later on in this article!

Ingredients
120g egg whites (I used liquid egg whites which you can buy in a carton from the Supermarket as they are pasturised)
200g granulated sugar
340g butter (soft but still cool)
1 tsp vanilla extract
1 Vanilla bean (seeds only)

Special equipment
Double boiler, baine marie / porriger pan or use a bowl over a saucepan – make sure this clean by wiping it with a lemon or vinegar
Sugar or jam thermometer

1. Beat your butter using a hand whisk and transfer to a seprate bowl for later.
2. Add about 1/2 inch of water in the bottom of the pan / bowl and add the egg whites and sugar to the pan / bowl
3. Whisk gently over a low heat until the egg whites reach 140C and then remove from the heat
4. Pour egg whites into mixer bowl and whisk on medium speed for five minutes. Continue on high until stiff peaks form. Keep whisking until the bottom of the bowl is no longer warm – this is really important as you do not want to melt the butter when you add it (this takes about 8 – 10 mins)
5. Add the butter one tablespoon at a time whilst still mixing and watch it until it has combined – continue in this way until all the butter has been added. If you mixture is soupy you did not wait long enough for the egg whites to cool – put the mixture back it the fridge and then try again in 15-20 mins. Is it curdled and yukkly? See below…
6. The mixture will come together to become light and fluffy – add the sticky toffee topping to your own taste – add a tablespoon of sauce (one at a time) whilst still mixing. Any left over sauce can be used over ice-creams for sundaes!

Dillema – The Swiss Meringue Buttercream Curdle (How to recuse it)
Yes I hit this problem and I kept mixing the buttercream like Sweetapolita tells you to do and have faith that all will be fine. After five minutes faith was leaving me, I tried putting it in the fridge, praying, beating it on high, low but none if it changed the fact that the SMB looked disgusting!

However I did find something that works on this site – take 1/4 of the mixture out and pour into a microwavable bowl – heat for 15 seconds and then stir it to get a smooth consistency before pouring it back into your mixture. Whisk again on a low-speed. This worked and I was so pleased to have saved the buttercream.

Toffee Swiss Meringue Buttercream

To Assemble the Cake

Cut each cake into two even layers (I use a tape measure to make sure each layer is evenly sized. I don’t have a cake stand that rotates but I do use a revolving cheese board stand but you could also uses a lazy susan to do the job. Add a dollop of buttercream to the centre of your stand and add your first layer of cake and press down – this will keep your cake in place while you work.

Assembly

1. Put half the SM buttercream into a large piping / pastry bag and use a large star open tip nozzle
2. Use a palette knife to spread out the sticky toffee sauce onto your first layer. Make sure you don’t go right to the edge or the sticky toffee sauce is likely to ooze down the sides of your cake.
3. Spread SM buttercream across the top of the sticky toffee sauce – again keep in from the edge
4. Pipe around the edge of your layer using and up and down (think waves at the sea) motion until you have gone round the entire cake
5. Add the next layer carefully so as not to squash the piping
6. Repeat until all layers are done
7. Cut up fudge pieces and add to the top if you wish

Sticy Toffee Pudding Cake

Important Storage Notes
This cake should be stored at room temperature which is fine if you used the pasturised egg whites. After a couple of days it will need to go back in the fridge if there is any left. However if you are putting in the fridge you will need to get the cake out and let it come back fully to room temperature or the icing will taste disgusting!

6 steps to Toffee Crispie Heaven (Gluten Free)


Last week (before I got sick and no these were not the cause!) I needed a quick lunch box filler that would cheer up a dreary Monday and these little cripsy bites definitely hit the sticky toffee spot.  I know we all have done rice cripy cakes but these are by far the best I have found and baking does not always have to be labour intensive.  When I offered them to people at first they just looked intrigued and then nibbled the top followed by:

‘?@??@??” echoes the expletives through the room and then silence as they paused to eye up the next bite with the same zeal found in a jelly baby head biter.

‘@@##?? they’re good!’ the muffled sound that tries to come out through stuck together toffee teeth. Random bits of rice cripsy fly in all directions and I take cover.

‘nom nom nom’ teeth nashing sounds make me wince as I pray they are not going to bite their fingers by accident.

When fingers become disguised
I think this is because I have had one too many finger biting incidents.  This is where my finger takes on a chameleon appearance cunningly camouflaging itself as something tasty but suddenly returning to its normal pink fingerish self but with the addition of pulsating teeth marks.  I scream out ‘oowwwww’ and shake my hand around desperately as if it will shake the teeth marks out and then I blow on it event though it’s not burnt>  Yes I know it is not going to make it better but it at least I am in control again and not the stupid ‘bit my own finger idiot’.  I wonder if this is why there is a lone wandering hand in the Addams Family as someone got a bit over zealous with a toffee crisp and bit the entire thing off either that or I have been scarred for life by my Dad’s favourite tea time program of which I can still hum the theme tune (thanks Dad as I know you are reading this x).

These treat size bites remind me of toffee crisp bars we used to get years ago and I loved them but nobody seems to do them anymore but now I can have them anytime I want (mwoahhhh ha ha ha – sorry been stuck in bed for days bit excited to be finally up).

These use only 6 ingredients and take six little steps to make and who knew wine glasses could come in in so handy for measuring!  All you need is baking love: butter, rice crispies / pops,  marshmallows, toffee and milk and then you are in chewy toffee heaven. They are moist, sticky and full of marshmallowy toffee which loves to attach its self to your teeth but this my family tells me is an added bonus as it allows them to savour the taste again later without gettng caught eating in class – personally I think one more tablespoon of milk would sort that out.

This is now one of my firm favourites for lunch boxes or anytime I need to get sworn at or dodge rice cripie missiles followed by silence.  I dipped the base in melted Toblerone and drizzled the top with chocolate.  You don’t need expensive ingredients I used the basic / value range of everything except the Toblerone (leftover from Christmas) so these really are a frugal baking thrill.

I found the original recipe here from the Nigella website posted by Lindz and adapted it only slightly:  If you do want to make them gluten free do check the ingredients on your toffees and marshmallows and use nestle chocolate instead as this is gluten free.

Ingredients

250g Toffees (Sainsbury’s Basics)
50g Butter (room temperature)
3 tbsp of milk
1 tbsp of golden syrup
115g Marshmallows
175g Rice Crispies or similar cereal

Instructions

1. Brush your desired tin or mould with baking spray or oil and wipe with a kitchen towel to make sure it is not too oily.  If you use silicone moulds always brush them lightly with cake release spray and then wipe off the excess with a kitchen towel even for cakes, choclates etc then your crispy treats will fly out of the moulds unlike one born every minute.
2. Add toffee, golden syrup, butter and milk into a saucepan and heat gently.  Stir the mixture as it heats until all the ingredients have melted.
3. Add marshmallows and stir until they have melted.

4. Add the cereal to the pan and make sure it is all well coated with the toffee mixture

5. Pour quickly into the tin or mould and level (it will stick to everything in my experience leaving wispy marshmallow strands everywhere)

6. Leave to set (about an hour) and drizzle with what ever chocolate you fancy but they are just as nice without too. Cut into sizes required and eat (one is not enough) they will keep for about 5 days if they get that long in an air tight container.

Chocolate and toffee cookies

Image


20111029-170118.jpg

Cookies are on the agenda today as they will always make you feel better when it is your first week back at work after a break.  I like cookies as they will go great with my morning cup of coffee as I desperately try to wake myself up.  This recipe is adapted from the God of baking Mary Berry Mega choc chip cookie from the book  which you can buy here.  Chocolate is the best invention ever – read why on my post here.

6oz (175g) soft margarine
8oz (225g) natural caster sugar (I store mine in a Kilner storage jar (see here for example) with used vanilla pods to make vanilla sugar)
2 eggs room temp
12oz (350g) self raising flour
4oz (100g) chocolate covered toffee pieces ( thorntons) chopped up

Preheat oven to 180c / gas 4 / 150c fan oven

Measure all ingredients and place in mixer.
Mix until a smooth dough.
Use 1 tbsp or 1 cookie scoop and set cookies well apart on lined baking trays.
Place in oven for 15 mins until lightly golden.
Place on wire rack to cool.
Store in airtight container.

Put kettle on and enjoy a warm cookie!

20111029-171441.jpg

Toffee fudge meringue

Image


20111028-172418.jpg

Meringue always reminds me of what we would have for my dads birthday each year as he does not really like cake (I know the horror of it!) and his birthday is on Christmas Eve and you know all you are going to get over the next 3 weeks is Christmas cake, Stollen and mince pies so he prefers to have something different.   Meringues are like little pillowy, chewy clouds of air and sugar that melt in your mouth.  This is my first attempt at meringue and I can say I was very pleased with the results. 

They do not take long to make at all if you use a mixer (I  dread to think how long they would take to beat by hand).   I even did the bowl over my head test and the meringue mixture stayed in – thankfully!


Ingredients

4 egg whites
4oz caster sugar
4oz vanilla natural caster sugar ( I use vanilla sugar see my post for more information)
100ml double cream
Toffee Fudge sauce (I used Sainsbury’s)

Instructions

  1. Preheat oven to 130c / gas ½  / 250f or 100c fan oven.
  2. Line 3 baking trays
  3. Place egg whites in a stand mixer or non metallic bowl
  4. Whisk on high speed until the mixture is forming peaks (but not really stiff that they do not move – there will still be some movement in your bowl.  Now would not be a good time to hold it over your head!)
  5. Add sugar 1 tbsp at a time to the egg mixture whilst still mixing on high speed.
  6. Once all the sugar has been added to your mixture it should be forming stiff peaks and is glossy. Now you should be able to turn your bowl upside down and no mixture should come out – put it over your head if you are brave enough!)
  7. Put the meringue mixture into a piping bag with a round 1cm nozzle
  8. Pipe blobs onto lined baking trays to the size you need . I used approx 5cm round.
  9. If you really want perfectly sized ones draw circles on the underside of your greaseproof paper using a plastic milk top or other round object to the size  you want them (no you can’t use dinner plates).
  10. Place in the middle of the oven for 40 mins until they can be lifted off the baking paper easily.
  11. Leave the meringues in the oven to cool if you like mallowy and chewy.  If you don’t like chewy take them out of the oven and leave to cool on the side.

 To serve

  1. Pair up similar sized meringues
  2. Whip 100ml double cream until thick.
    Pipe  cream onto the side of one meringue using a star nozzle
  3. Drizzle toffee fudge sauce over the top (Sainsburys – I take no credit) 
  4. Sandwich a similar sized meringue on the top. Serve and enjoy! 

 Tip: They will start to absorb the moisture from the cream after a few hours so make, serve and eat for best results.